I have long had a casual interest in 3-D printing and wanted to try it some day. But, printers were expensive, complicated, I didn’t have a good space to put one, and I didn’t have enough need to justify the cost. Well, it turns out that most of that has changed and I am now a newbie 3-D printer owner.
This article is a place for me to show off my research, successes, failures, and lessons. As I am very much a newbie at this, please don’t take anything I write as expert advice – it definitely is not. But perhaps you can avoid some of my mistakes and find some new ones of your own to make.
The Fateful Decision
Last November, I was scrolling though my Reddit feed. Someone had posted a picture of a full-sized Christmas wreath that was made up of a few 3-D printed and very scaled up copies of Lego pieces. That struck me as really cool, so I sent the picture to my wife who agreed that it was really cool too. I took a quick look at printer prices and was amazed at how inexpensive they had become. Coincidentally, she had been in a computer store and noticed inexpensive 3-D printers on display.
So, I spent a day binging 3-D printer videos on YouTube to figure out just how inexpensive a model that I would actually be happy with would be. I wanted something that worked well, had a community of helpful people using it, that I wouldn’t outgrow and want something nicer too quickly, and that was affordable enough that I wouldn’t feel too guilty if I didn’t end up enjoying or using it a lot.
Here are a few of the great 3-D printing channels that I enjoyed:
I quickly learned that there are two main types of home 3-D printers. They each have a variety of names and different subtypes and options. There also lots of expensive specialized, professional options that use the same basic technology.
To me the first type are resin printers (also known as SLA, DLP, or MSLA) that use light to selectively harden zones in a liquid resin to create the desired shape. These printers are generally higher resolution and smaller volume than the second type. They are preferred by people who are printing small gaming miniatures, jewelry, or similar scale items. They can be smelly and a little messy. A shop type floor is much better than a carpet when the inevitable resin spill happens.
The second type are Filament machines (also called FDM). These use a spool or spools of plastic filament which is melted and deposited by a moving printing head onto a base table. They are a better choice for larger scale items such as toys, cosplay components, model aircraft and rockets, etc. Given my carpeted office space and the types of things I wanted to print, this was the style of printer that I chose.
The sweet spot for me turned out to be the Creality Ender 3 line of printers. You can get a version 1 of the printer for about $200 with upgrades to the Pro at $240 and the version 2 for $260-$280. It seemed like the version 2 upgraded features were worth the $60, so that is what I chose. I found a $20 coupon from an official vendor on Amazon and placed the order.
- Ender 3 v2 Review on BV3D
- Ender 3 v2 Review on The 3D Printing Zone
- r/ender3 and r/ender3v2 on Reddit
Order placed, I had to make room. I had a space in my home office that held two unused half-sized filing cabinets and a bunch of miscellaneous stuff. I cleared out the file cabinets, shredding 30 year old leases and other ancient financial documents, donated the cabinets to Goodwill, and bought a sturdy 4-foot folding table and some plastic storage tubs of various sizes from Costco.
Then I did some more research on setting up and using this particular model. I found a great Ender 3 v2 Setup video on BV3D. After seeing how little filament came with the box, I also placed an order for a light blue spool that would go well with the stock blue accents. For this printer you want 1.75mm filament and to start with you want PLA material (it can use lots of other types of plastic too, but PLA is an excellent beginner’s choice.)
Assembling the printer, following the BV3D video, took about an hour. Setting the z-limit switch position and leveling the bed were a little frustrating, but I eventually got it right. I also had a power issue when I plugged in the power cable for a monitor that was being stored under the table rather than the printer.
I fired it up, chose one of the demonstration objects that came on the included micro-SD card and printed my first object.
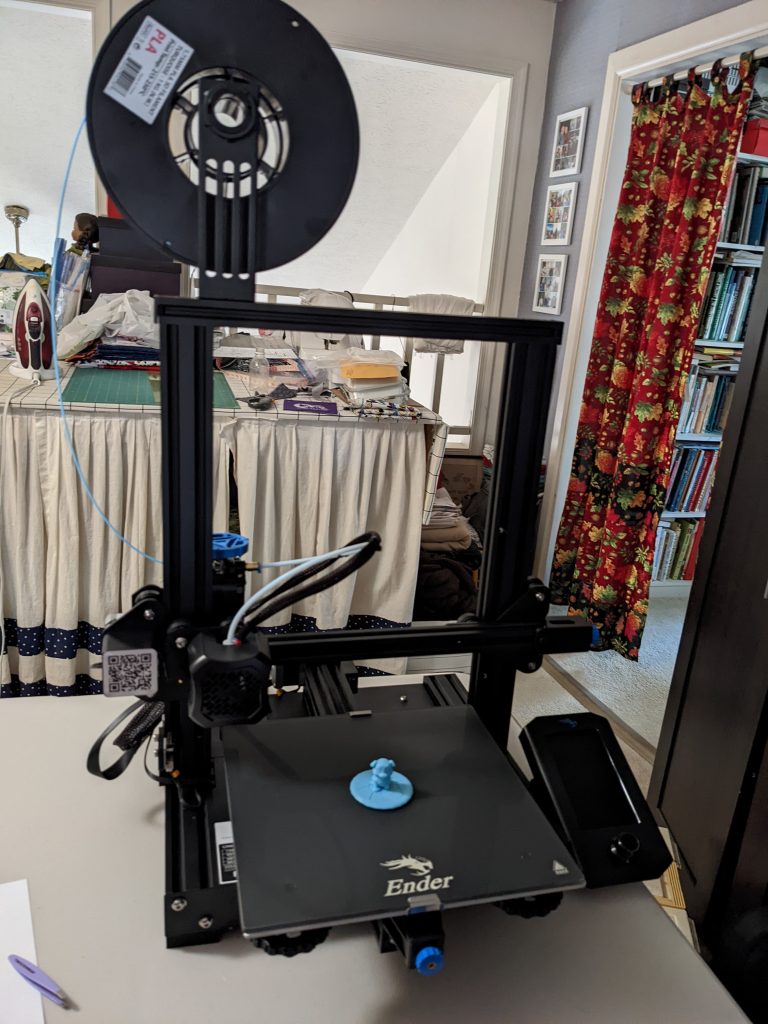
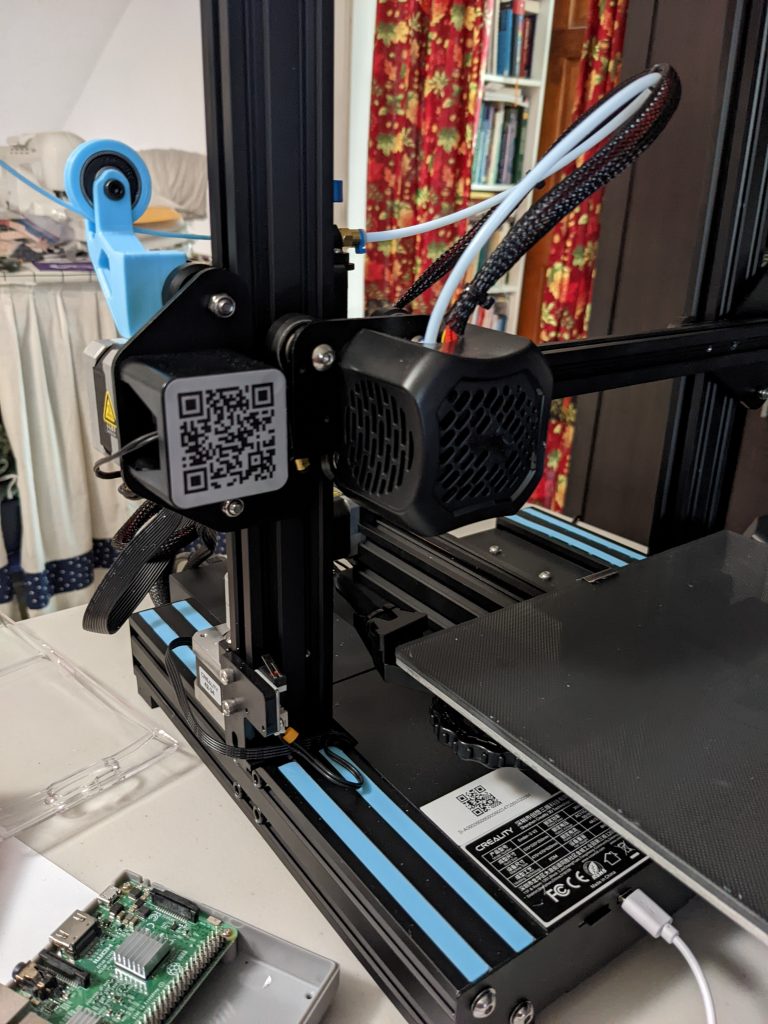
The filament is wound around the spool at the top of the first picture. It feeds down to the extruder, which is a motor that pulls and pushes the filament into the printer. On this printer, the extruder is on the left side with the blue knob on it. The filament is pushed into the flexible, white, “Bowden tube” that guides it into the print head (small black box on center left). The print head moves left/right along the x-axis, and up/down along the z-axis. The print table itself moves in and out along the y-axis. Heat is applied to the filament to melt it at the bottom of the print head where the liquid plastic is pushed out of a small diameter nozzle (0.4mm is standard on most similar printers) and deposited onto the print bed or partially printed model.
Another funny operator error: after the first print I waited patiently for the nozzle and bed to cool all the way down watching the temperatures on the screen. But they got down to around 22C and stopped. It took me a while to realize that 22C was room temperature. Given the use of Celsius temperatures and millimeter dimensions I am slowly internalizing the metric system more than I’ve previously had to.
My next step was to perform several simple upgrades to the printer. The first change was to upgrade the printer firmware to the “Jyers” version following the BV3D video on the upgrade. This printer operating system upgrade adds a number of useful features including bed leveling assistance. “Bed leveling” is the very important process where you adjust the printer so that the printing surface is parallel and at a known, very small, distance from the horizontal travel of the print head.
More to Print
I also printed a couple of small upgrades to the printer itself. But before I describe them, I want to step back and describe how to make or find models to print.
3-D printing models start out being built in a CAD package. CAD software can be simple or complex, free or expensive. (Or, if, like me, you have a structural mesh generation program that you wrote for work, you can add a 3-D model output routine.) If you have very specific needs you may need to go this route to create a model. 3-D printing models use the STL (“STereo Lithography”, “Standard Triangle Language” or “Standard Tessellation Language”) format.
The good news is that there are thousands of STL files out there available for free or purchase. Its very likely that your early printing projects will already be available. Some great sites to explore include
Look at the most popular toys (Flexi-Rex or another animal relative), benchmark/testing objects (Benchy , xyz calibration cube, or all-in-one test), or upgrades for your particular printer.
Once you have an STL model that you want to print, you need to “slice” it. The slicer program takes the triangles in the STL model and generates instructions for your printer that tell it where to move the print head and when and where to extrude melted plastic. It outputs a “gcode” file that contains those commands. As with CAD programs, there are free and paid options. The two most popular choices are both free:
- Ultimaker Cura (the Ender3 comes with a rebranded copy of Cura)
- Prusa Slicer
Find and watch a good video or two on using the slicer you choose. Most of the printer settings are specified in the slicer including nozzle temperature, bed temperature, infill and supports. Some of these settings will need to be changed as you change filament types or brands. Other settings will need to change depending on the particular model. Check the description and discussion of the model that you downloaded to see what settings other people have used.
Once you’ve sliced your model, save the gcode file to your micro-SD card, eject it from your computer and plug it into your printer.
Initial Printer Upgrades
One of the cool things about 3-D printers is that you can use them to print their own upgrades. However, printing upgrades for your printer really shouldn’t count as a productive reason to own a printer. Having said that, the next thing I printed were two simple printer upgrades.
The first upgrade was a set of covers to slide into the horizontal slots of the printer frame. These slots apparently collect lots of crud and can be difficult to clean. Some people really bling up their printer and add covers to the vertical slots too. Sometimes people go subtle with black or bright with red or yellow. I chose a light blue similar to the included knobs. The stock cover STL file is 100mm long. I measured each slot and scaled just the length up or down to fit the length I needed.
My second upgrade was a filament guide to help line up the filament with the extruder. There are several options. The one I chose required the purchase of a small 608 bearing from Amazon and an M4 bolt. I had to reprint the wheel part 2% larger to get the bearing to fit into its space. This may be a slicer setting that I had wrong, I don’t know. Also, the design was not for the version 2 of the printer so didn’t fit completely over a bolt end that was slightly different, but it still was nice and snug without going completely over the bolt head.
I had some problems with “adhesion” where the plastic didn’t stick to the bed while it was in the process of being printed. I experimented with changing the nozzle and bed temperature, flipping the glass bed from the textured to the plain side and washing the bed with Dawn dish soap. Eventually, the clean, plain side, with slightly higher temperatures worked well.
My First Project
Think back to the picture that motivated me to start researching printers: the Lego-inspired Christmas wreath. You can download the model files from thingiverse for free here. As a test, I scaled the pieces down 50% so that I wouldn’t use a lot of filament until I had settings dialed in. And I needed a few tests due to changing brand of filament:
Eventually, I got it working nicely.
Incidentally, this is what the inside of these pieces look like with 20% infill. The thin outer edge is called a brim, which helps with adherance and is easily removed after printing. The small blobs in the middle of the lower left circle are there to support the horizontal surface that is about to be printed above them.

Like the bearing/wheel issue in the filament guide, I had some problems with the pieces fitting well together. I tried using a dremil tool to enlarge some of the openings, but the plastic softened and got pushed around rather than being sanded off. An exacto knife did a better job of beveling edges and making a little more space. Next Christmas when we use the wreath we will probably end up gluing it together.
After a little bit of thought, I repeated the scaling solution from the filament guide. I made two more wreaths for friends where I printed the four bottom branches 2% smaller, the berries for those branches and the four upper branches at normal size, and then the four top berries 2% larger. This solved the fit problem. I also completed the 50% scale wreath using the same approach. Again, I don’t know if there was a flaw in the original model or if I had a setting wrong when I sliced it. I suspect the latter. I did get comfortable enough that I printed multiple berries in the same run and saved the time of swapping a model out and starting the next one.
More Toys and Tests

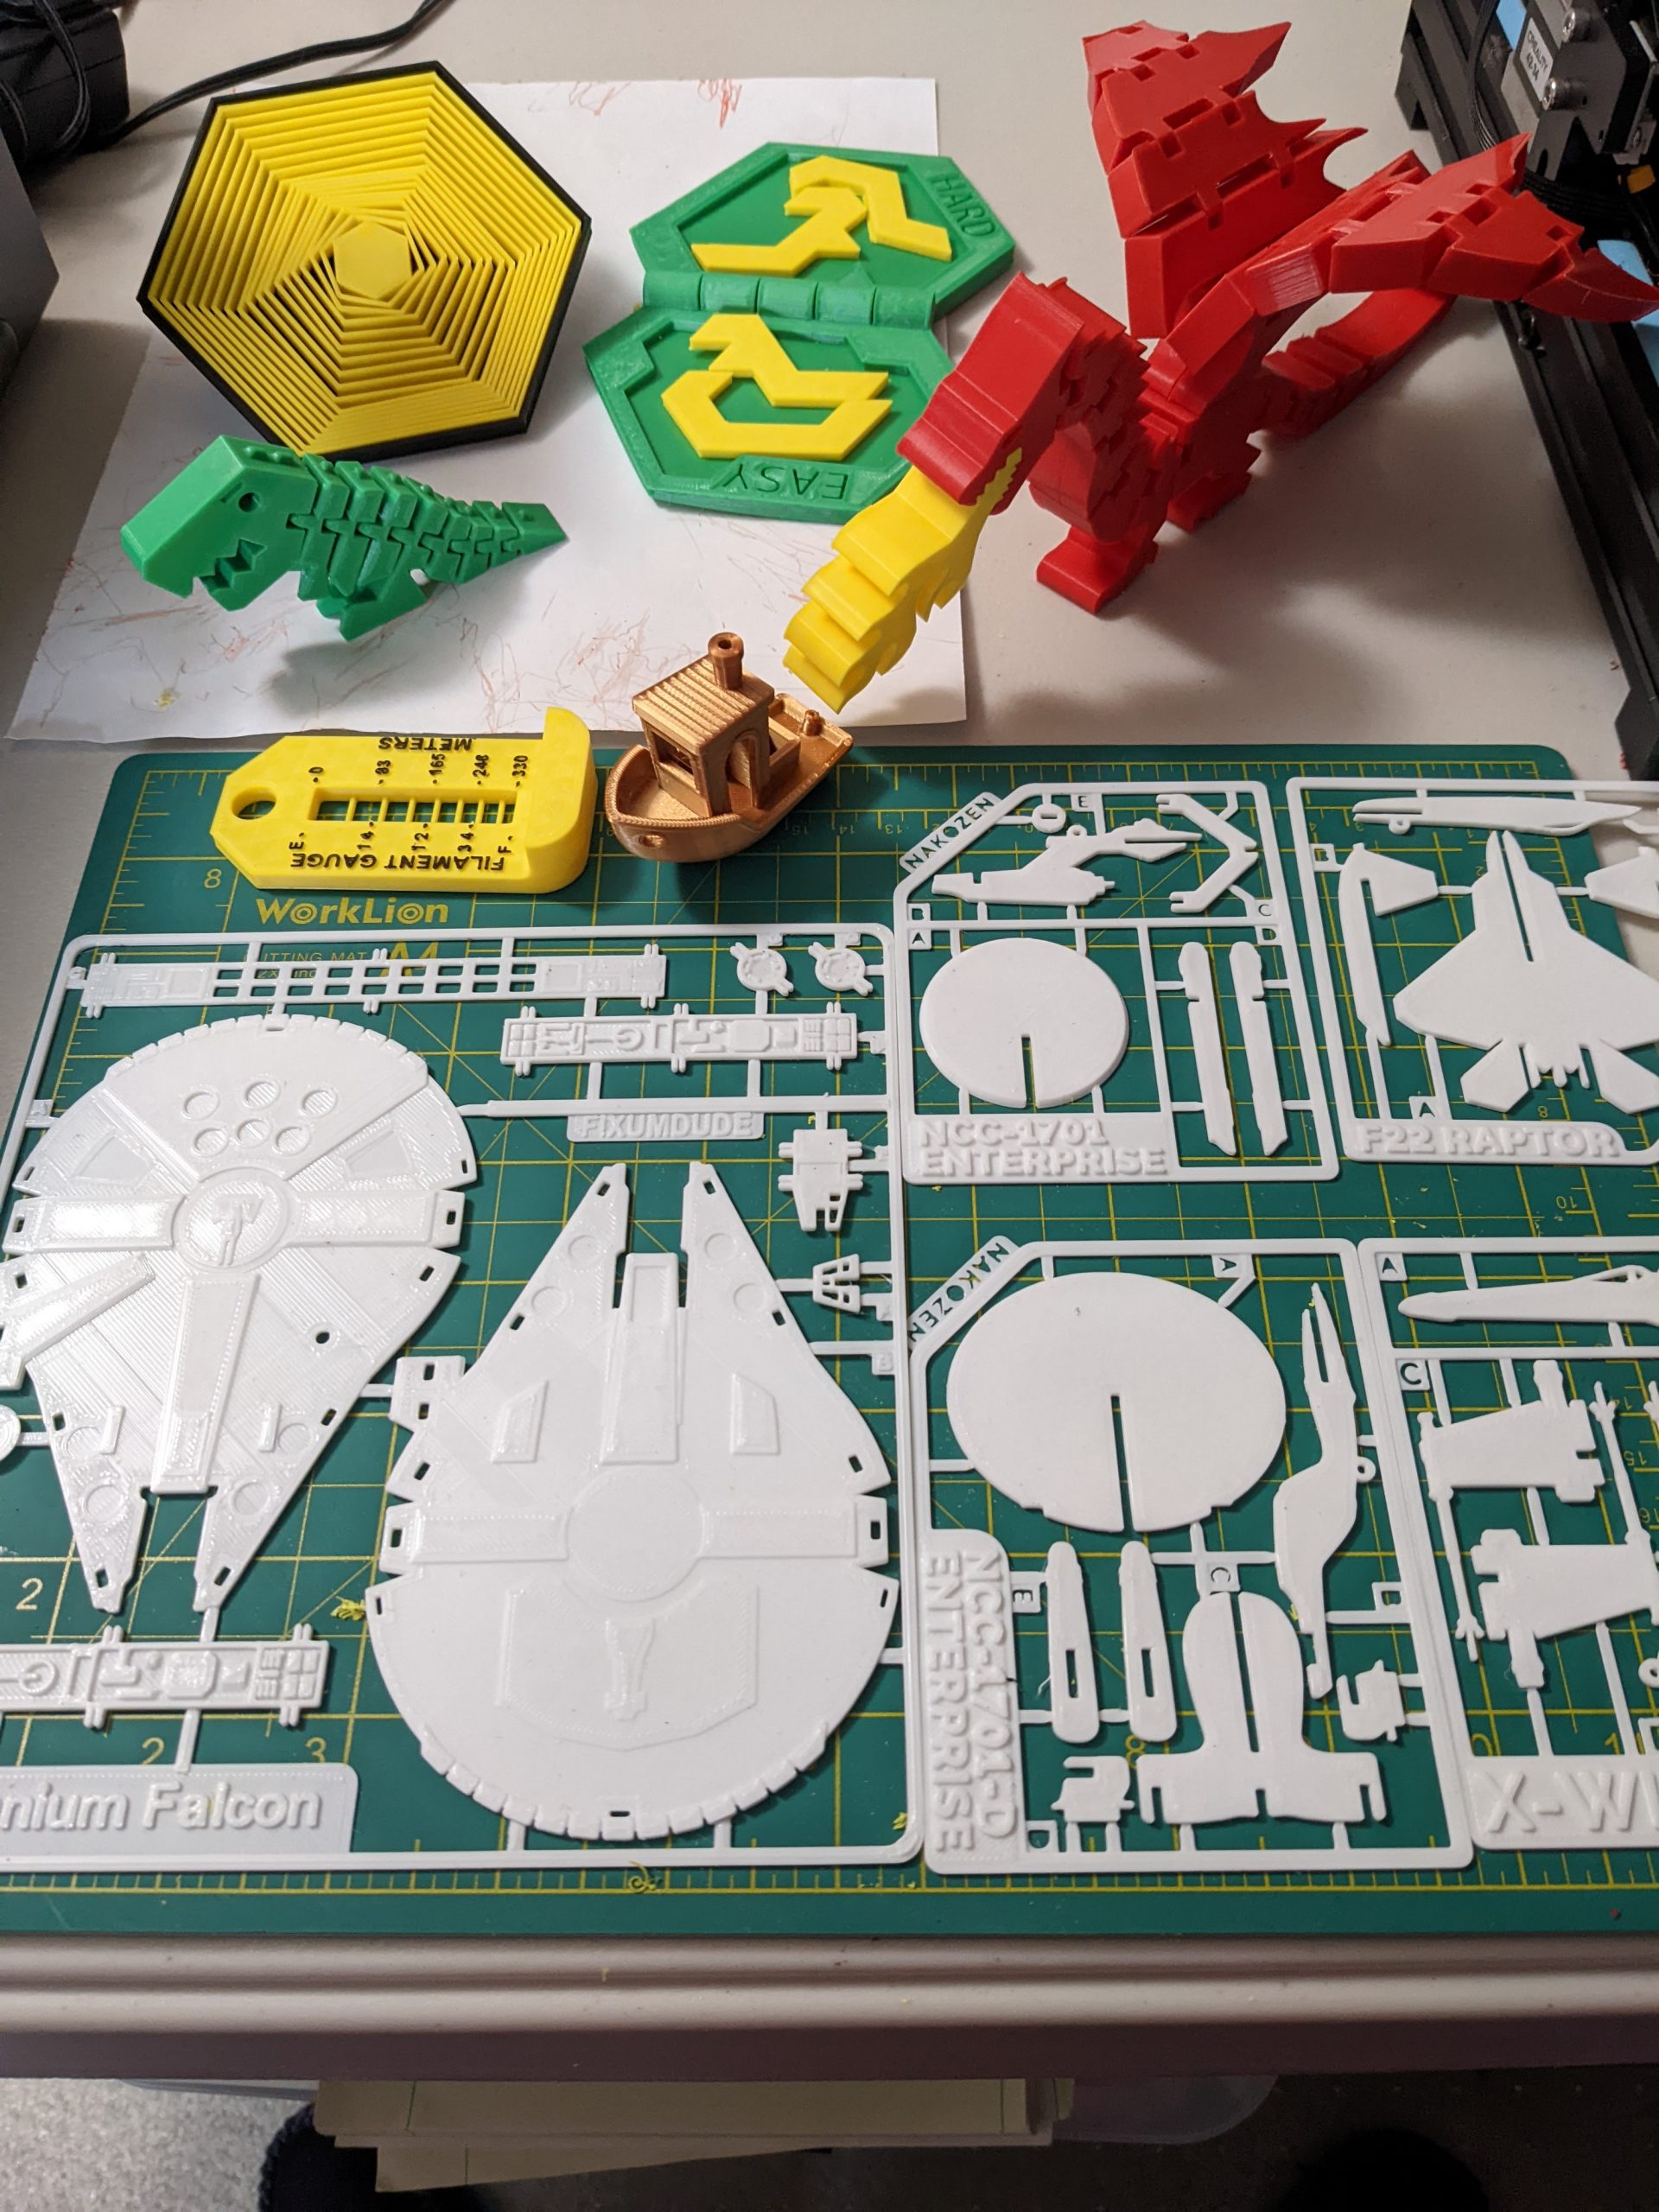
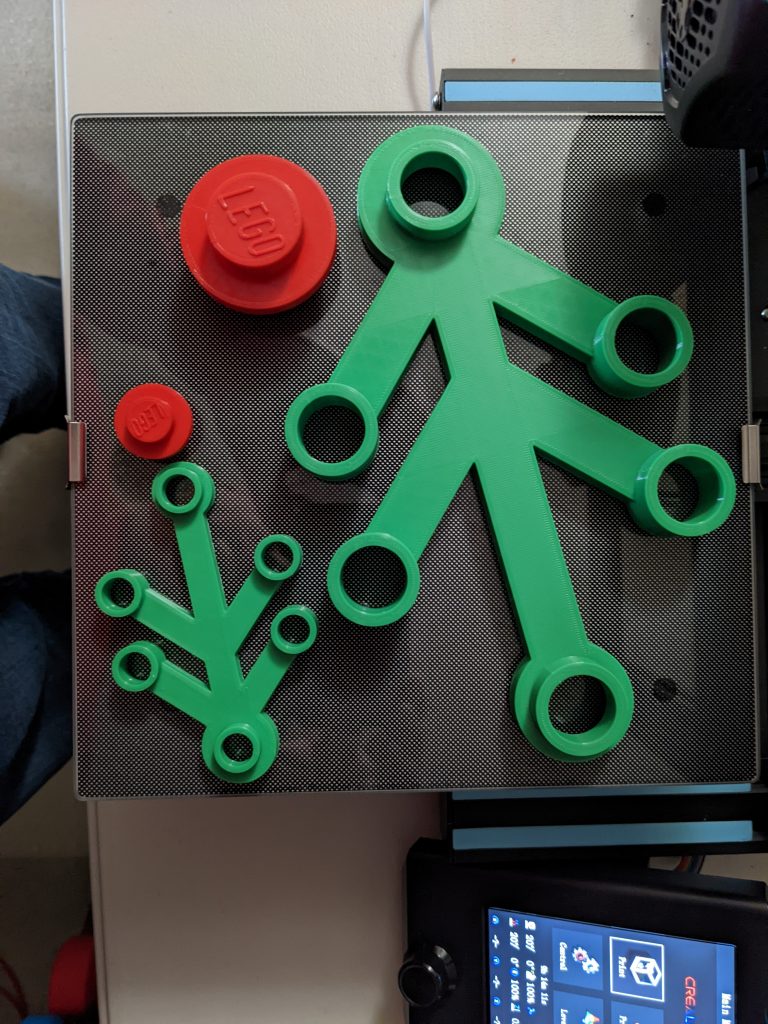
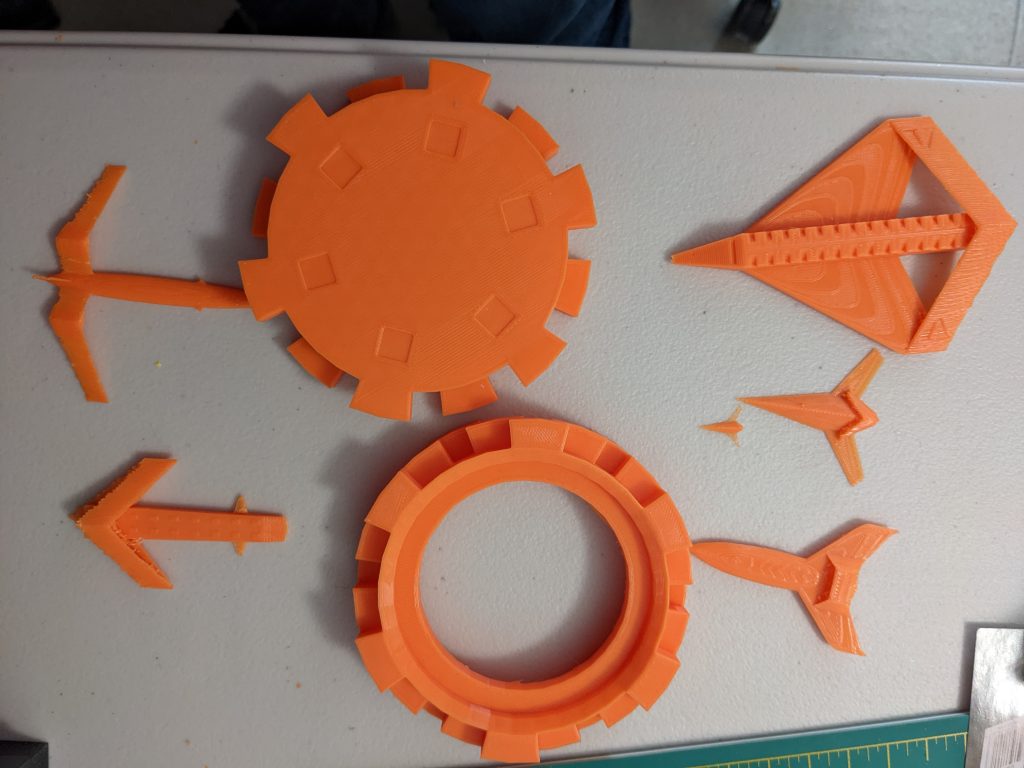
While working on the wreaths, I took a few breaks and printed some other fun things that I found. The white punch out vehicles are called “kit cards“. I also printed a Flexi-Rex (green), a Flexi-Dragon (red with a separate yellow flame), a hex illusion, a puzzle, a benchy calibration boat, and a filament spool gauge.
Rocket Science
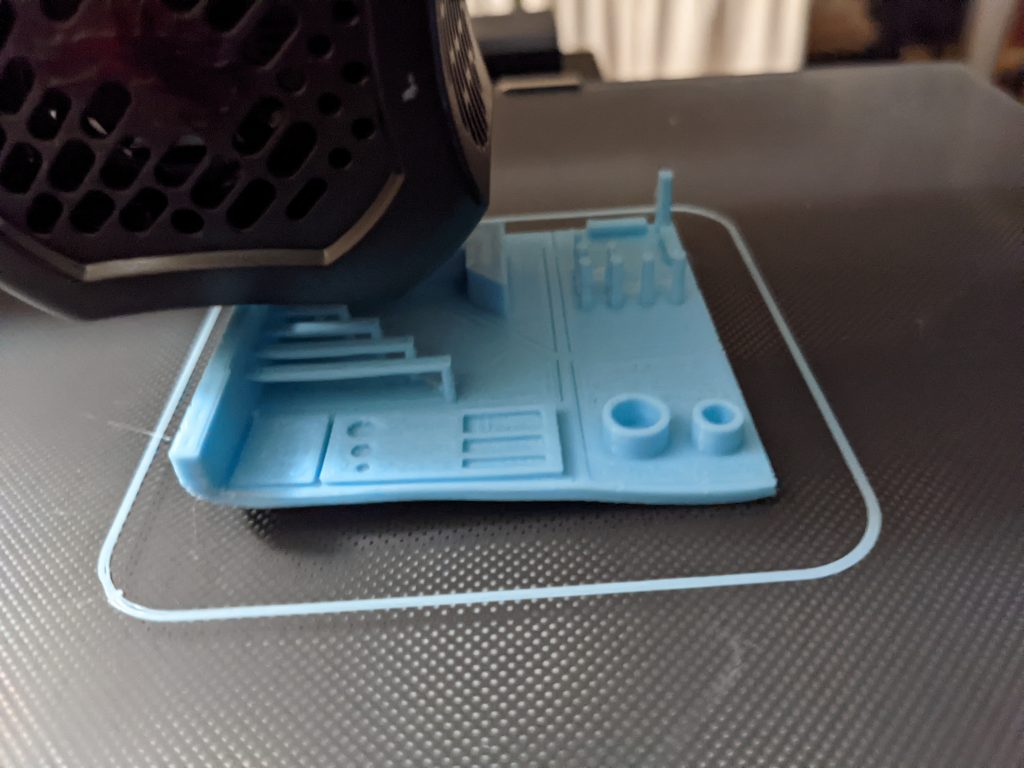
As part of my job at NASA, I created a parametric mesh generation tool called Loft. Since I initially posed this article, the manual has been updated and the program has been released for free non-NASA use. It was easy to add SLT format output to the half dozen previous mesh output formats. I then sliced and printed a few examples to demonstrate that it worked. In general, the models that I create for finite element analysis are not watertight and are therefore not directly 3-D printable. But, Loft can create watertight models with a little extra effort.
I probably won’t create many models this way, but it was a potentially useful capability that was very easy to add and demonstrate.
Dragons?
Another really cool model that I spotted was an amazing articulated dragon. Like the flexi-rex and flexi-dragon above, the main body prints in one piece (the two whiskers are separate) but has joints that bend and flex. This is the one model, so far, that I have paid for. It cost $4.
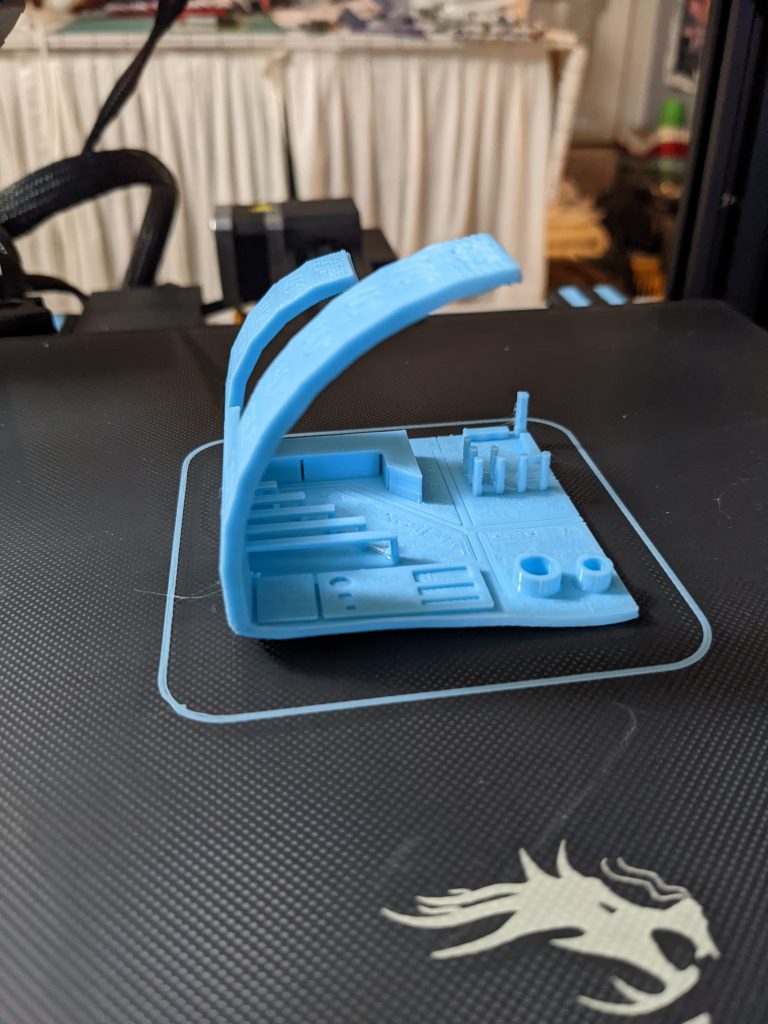
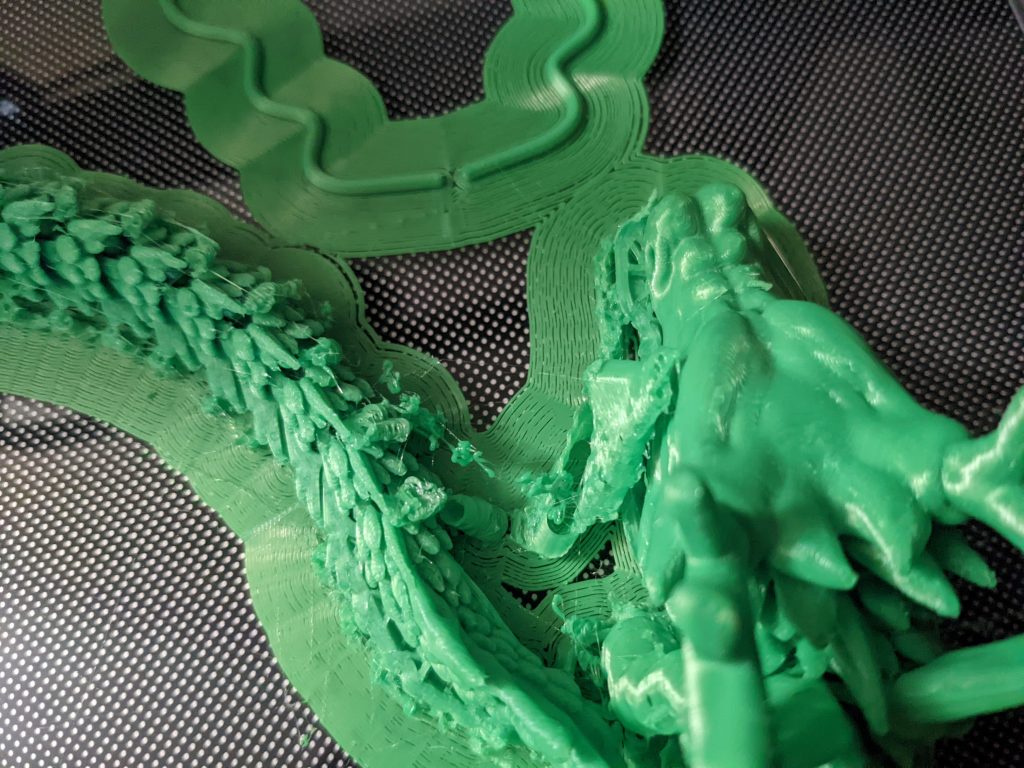
I bought a cool filament that was metallic and changed colors every few meters. It was from a different brand and had different recommended temperatures. I printed a “benchy” boat (see the copper boat in the toy picture above) to check printer settings with the new filament. It came out great. So, I loaded up the dragon and started printing. The slicer said that the print would take more and a day to complete. It ran for a few hours, looked good, and I went to bed. In the morning I found this:
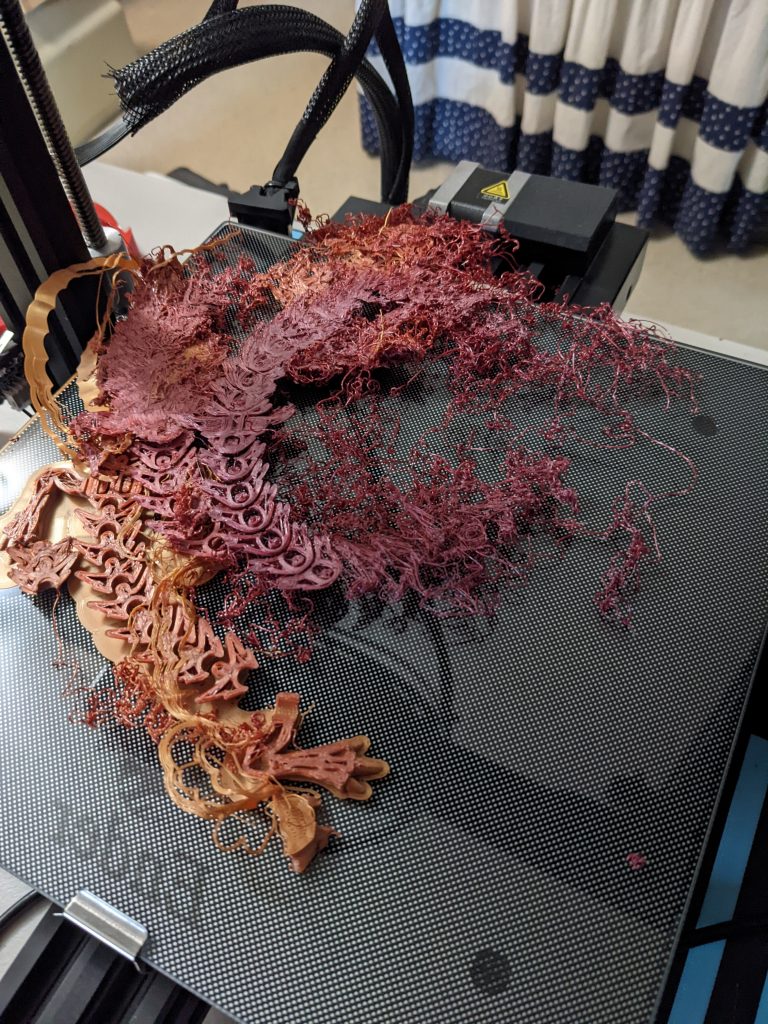
At some point the model lost adhesion and rotated on the surface. The printer happily kept extruding plastic, partially into thin air. When I saw the situation, I stopped the print, cleaned everything, adjusted the temperatures a little and then tried again. The second try went much better but started to fail a little past the 20% completion point. This time I was still awake and checking the print frequently, so I didn’t end up with spaghetti.
I stopped the print again and took a step back.
Hardware Upgrades
A Reddit user had suggested this hardware upgrade bundle to me. For about $20, it includes upgrades to the bed springs, the plastic parts of the extruder mechanism, and the Bowden tube. I had bought it a few weeks earlier but set it aside while I was using the printer almost 24×7. Now that I wanted to to address some potential bed leveling issues I decided to install the springs. While I had things taken apart, I installed the other upgrades as well.
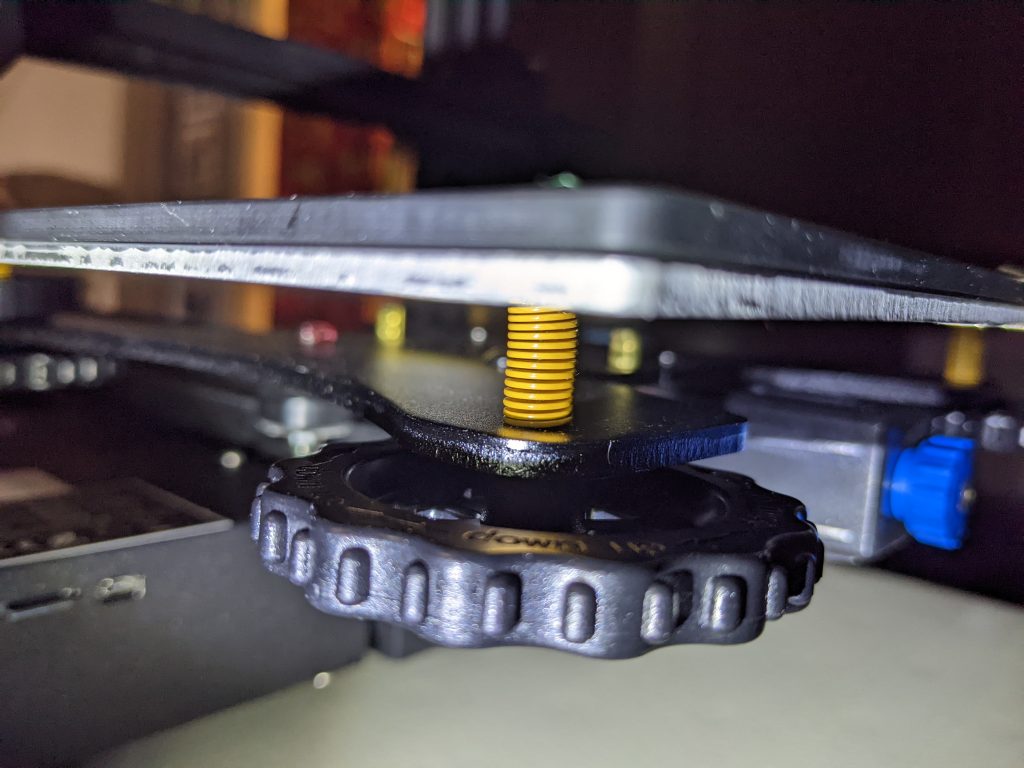
The springs are much stiffer and are supposed to keep the bed in place better once leveled.
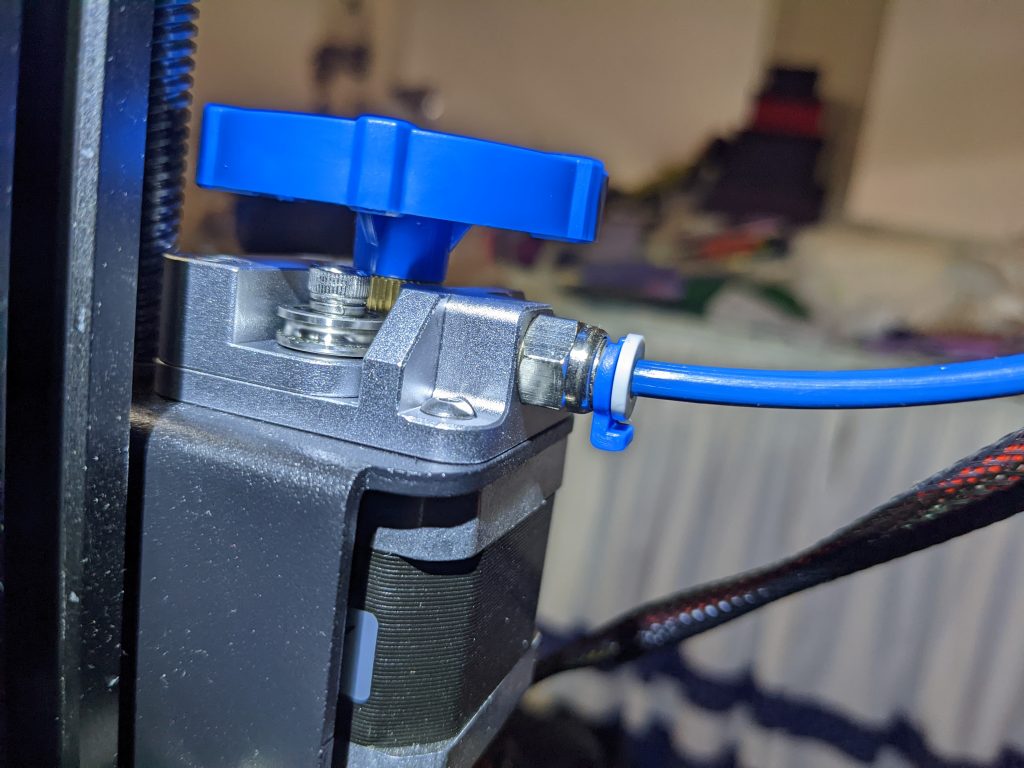
The stock plastic extruder is known to crack (which shouldn’t be a problem with the new aluminum one) and the new tube has less friction. Together they improve the consistency of the filament feed. In my very limited use since installing the upgrades I have also found that they make it much easier to change and load a new filament color.
Running Again?
Replacing the springs meant that the bed was now at a slightly different height. So, I had to reset the z-axis limit switch and relevel the bed. Both are a tedious and slow process for me, although I expect I’ll get better over time.
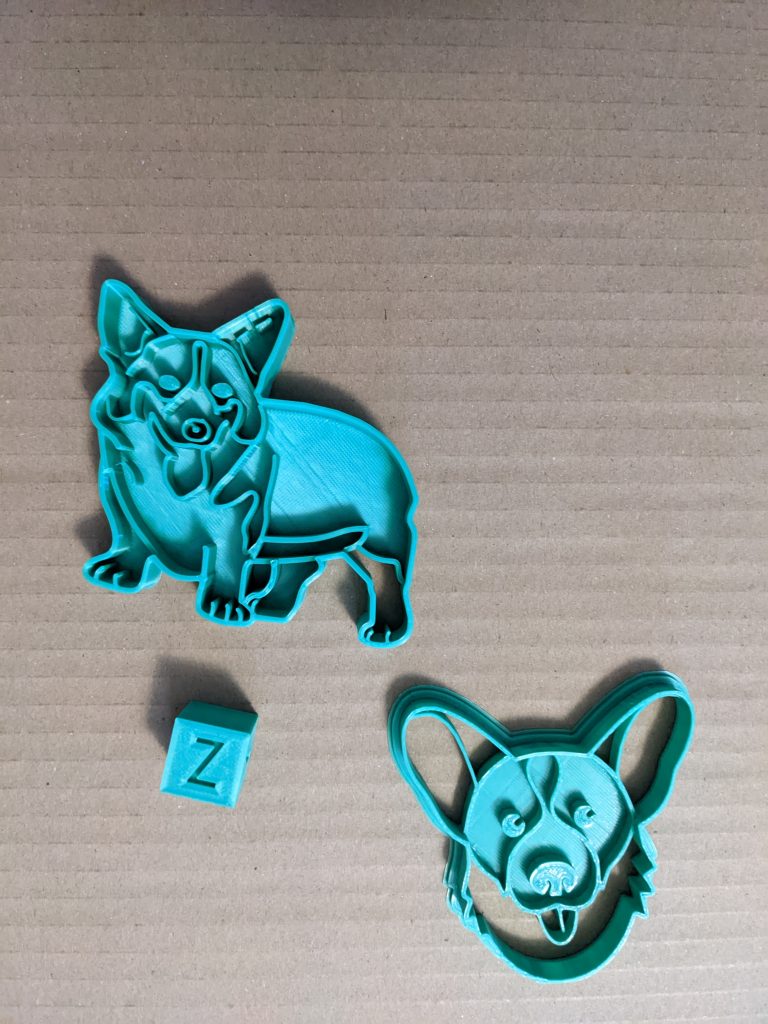
I put my most-used green filament back in and printed the 20mm xyz calibration cube. It came out great. Then I printed some simple cookie cutters for a friend which also printed fine. (The PLA plastic is generally too porous to be considered food safe. The friend will be using them with clay.)
Small Tool Collection
We have a nice woodshop off of our garage, but I wanted a small collection of tools that could live with the printer upstairs in our office loft. The printer came with several allen and open-end wrenches plus a putty knife and a filament cutter. I have added a set of tweezers, a pair of needle-nosed pliers, a set of exacto knives, a set of wood chisels (as yet unused), a 12″ digital caliper, some emery boards, a set of small metal files, a 6″ metal ruler with a metric side, a small rubber mallet, and a set of small squirt bottles with water, isopropyl alcohol, and soapy water. Some of the tools have seen a lot of use and some have not.
Dragon Try 3
After the hardware upgrades, resetting the z-level switch, releveling the bed, and a couple of simple prints, I started the articulated dragon again, but with the green filament that I’ve already run through almost two spools of. This time it ran to completion with no spaghetti.

But…. there was a shift in mid print that is visible at the elbows and the jawline. It happened across the whole model but is most visible at those two points.
This shift is enough that the dragon doesn’t really articulate. It mostly looks ok, but no motion. One possible explanation is that the print took more than 24 hours, it is January, and we have our house thermostat set to allow the house temperature to get a fair bit lower while we’re sleeping. If that is the problem then waiting until winter is over or printing in an enclosure could address it. (I have purchased but not set up the official Creality thermal tent enclosure. My initial use case was to keep dust off it when not in use – which has not happened yet.)
Science Fiction Ships
I also have some science fiction space ships that I created for a college movie project that I am working to try to convert and print. They were created in Lightwave 3D on a Video Toaster 4000 in 1994. I have upgraded my copy of Lightwave several times and now have the 2018 version, which will directly output STL files of my models. These are not watertight, as they were never intended to 3D print. But, pulling them through Microsoft’s 3D Builder and letting it auto-repair seems to work pretty well.
But first, another printer problem. I started getting very wispy prints. This was due to some combination of my filament binding on its spool, the extruder getting gummed up pulling on the hard to feed filament, and the nozzle getting partially blocked. The symptoms were a clicking extruder and the very wispy prints due to too little filament.
After swapping filament, cleaning the extruder, cleaning the hot-end, replacing the blocked nozzle, releveling and remeshing the bed, the problem was fixed. I printed a test benchy which worked great, and then I was off printing my old vehicles.

These aren’t perfect. Some of the details were lost in making them watertight. I may revisit them once I get a little more experience under my belt. You can watch the films here and download the model files to print yourself here.
It’s really cool to be able to woosh spaceships that you designed around the room. The 8″ long model of the Mirage is particularly wooshable.
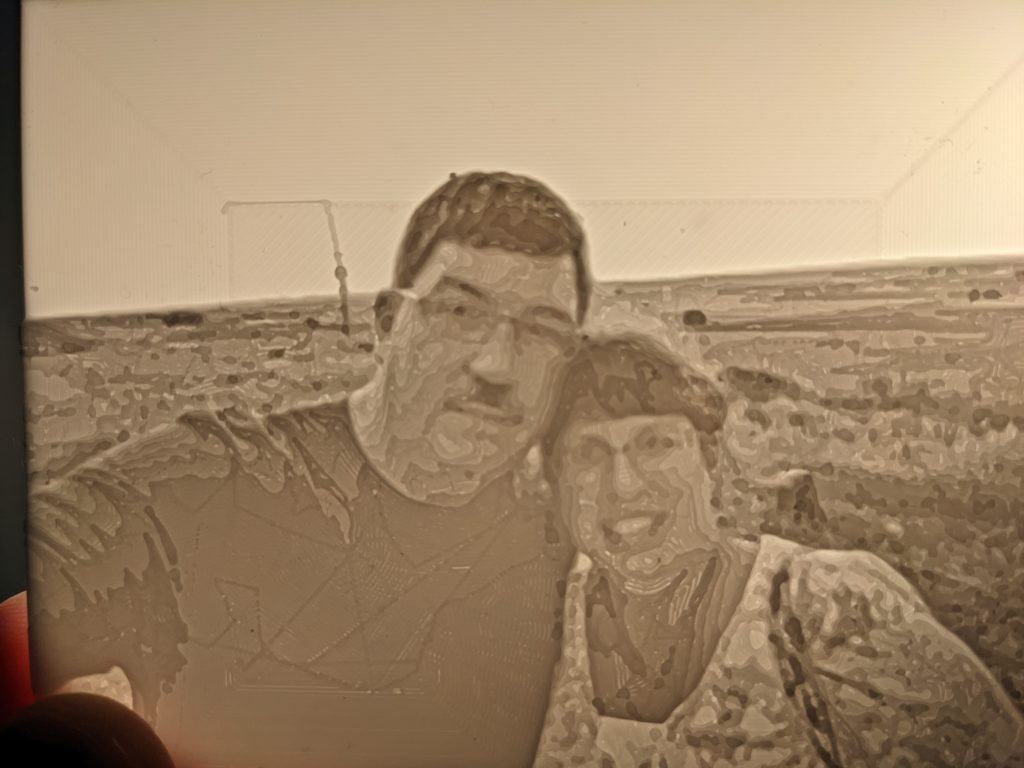
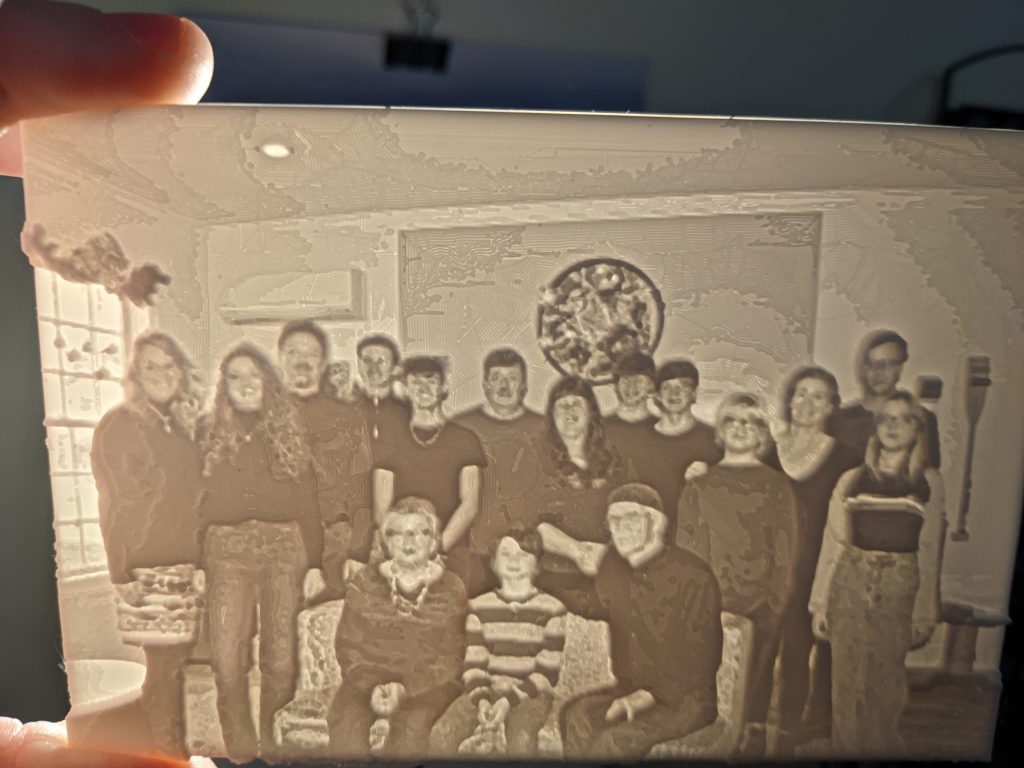
Lithophanes and Chains
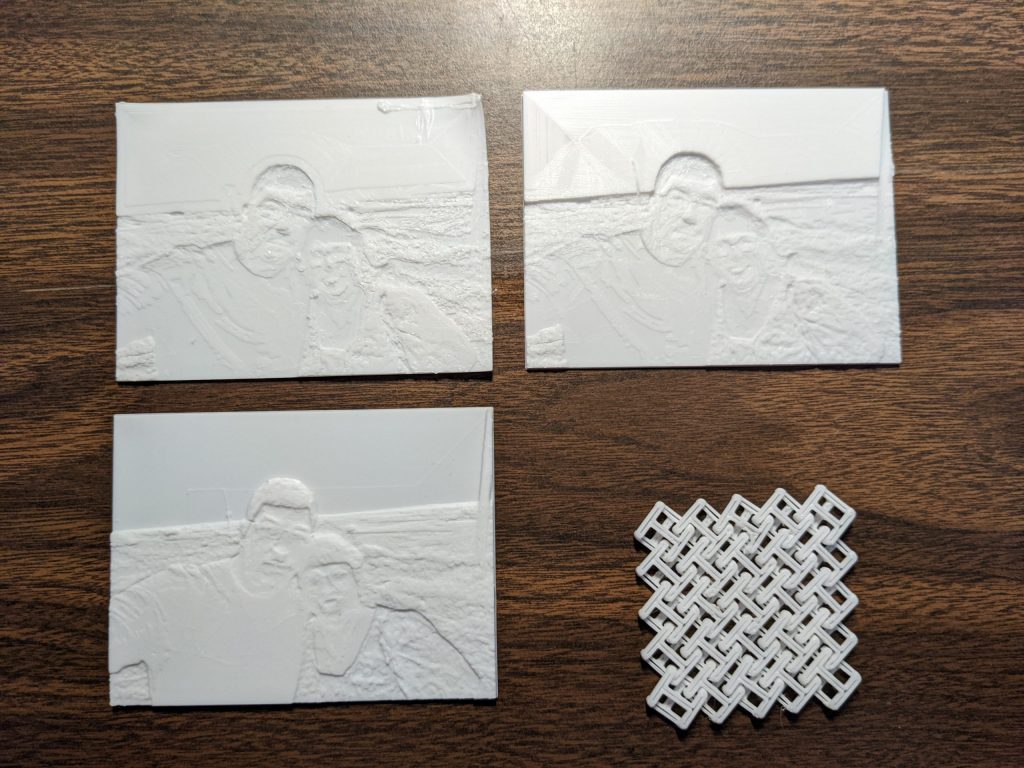
A lithophane is a cool type of print that embosses a photograph into your print. If you shine a light through it you’ll see a black and white image (see below). I had some bed adhesion issues with my first try that caused the corner to warp up enough to catch, hang up, and pull out a screw on the print head fan housing. So, I repaired the issue, added a brim to the print, and tried again. It printed successfully, but I had selected a negative version of my image, so it wasn’t very interesting. Finally, I was successful with a positive print version of one of my favorite pictures of my wife and I:

You can create your own lithophane model files from your own photos at this site. You can even make various curved shapes for use as a lamp shade.
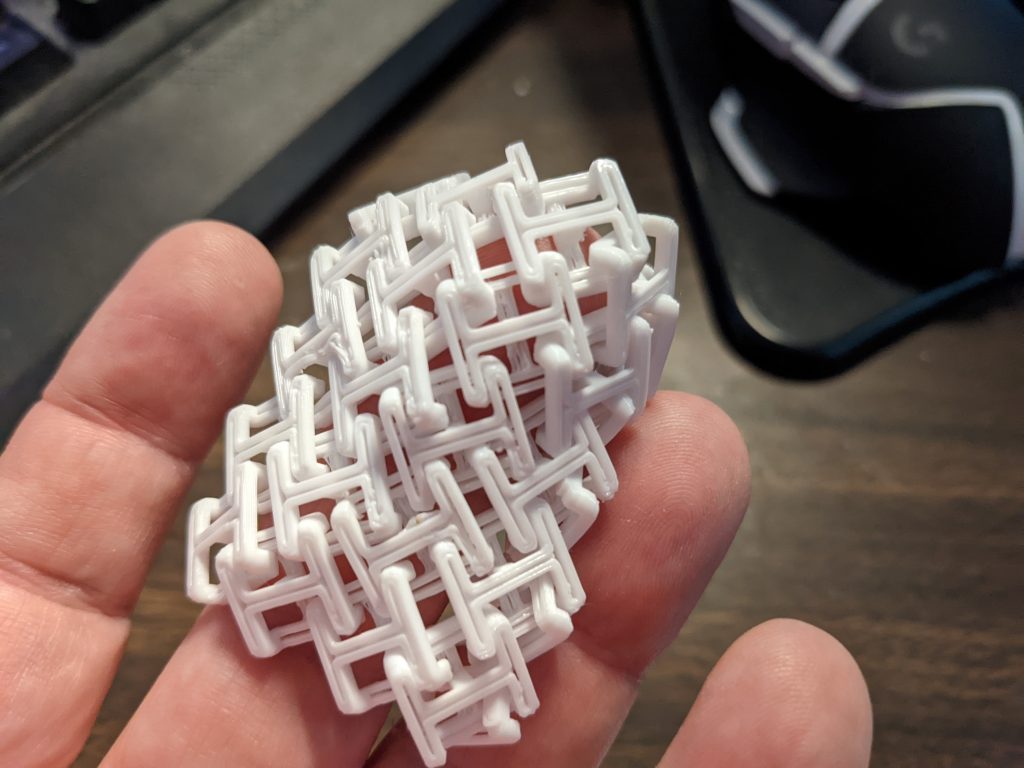
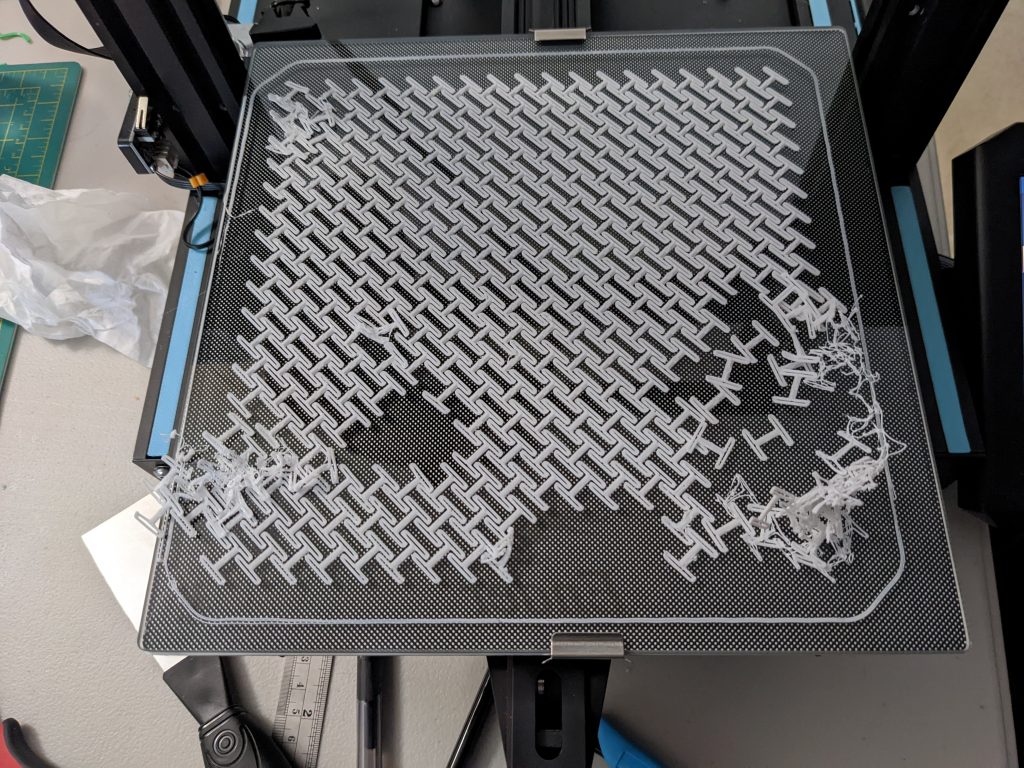
You can also 3-D print chainmail style cloth that doesn’t require any supports or brim and is flexible the second you take it off the printer. The sample sized model is shown in the pictures above. I had a printing failure when trying to print the larger size:
I next tried a larger, more detailed lithophane that came out pretty good.
Then I tried some solar system artwork and an articulating armadillo lizard:
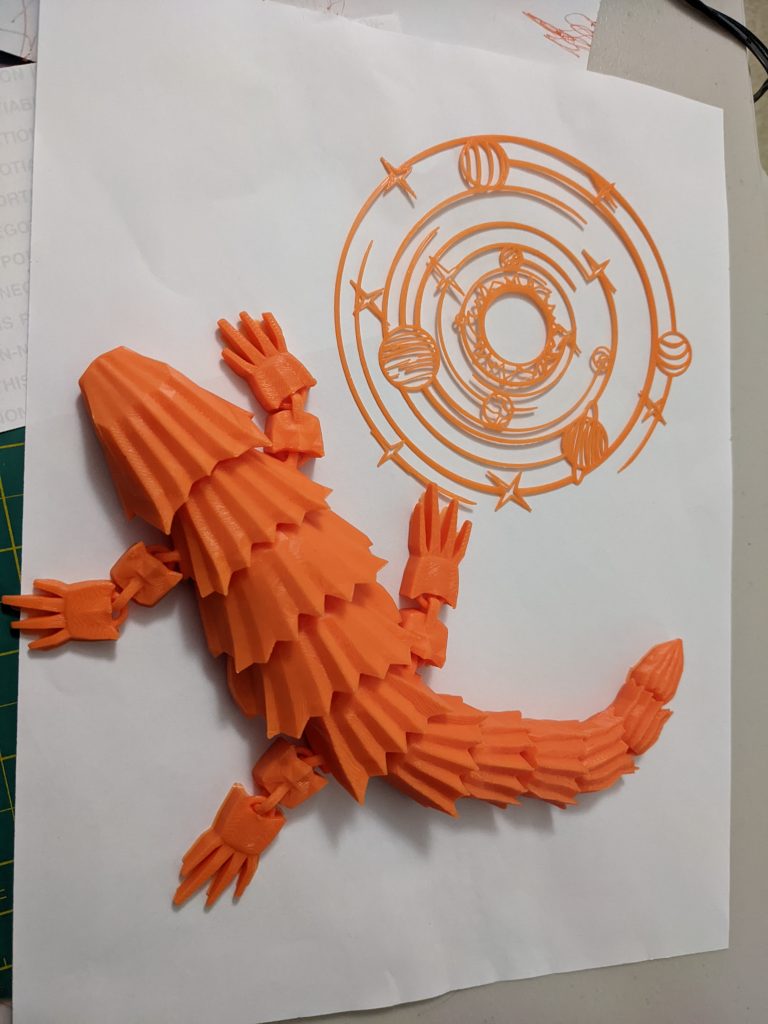
The solar system artwork is stiff enough to pick up, but a little thin. Two joints in the lizard broke when it fell from my shoulder onto a carpeted floor.
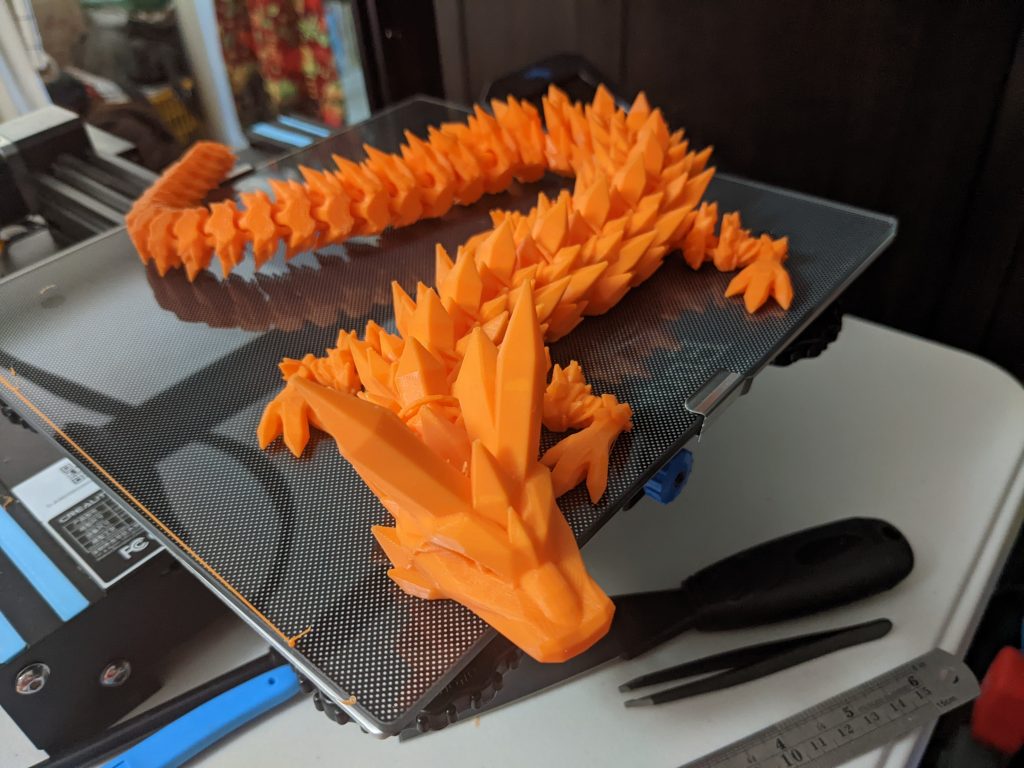
Another Dragon!
I spotted another very similar dragon model on MyMiniFactory and decided to give it a try (another $4 purchase). The instructions suggested using a raft for printing support which I had not done before. It took 40 and a half hours, but the print came out great. I used the orange filament that I’ve been using a lot lately.
Emboldened by my success, I put the multi-color filament into the machine to see if the raft would come out clean. It came out perfect, so I left the print running. Alas, overnight, during the last few hours of the print, it stopped depositing new filament. The filament snapped at the entrance to the extruder. I’m going to take a break from the dragon and print some smaller things for a while and may try again later.
Wiring Work
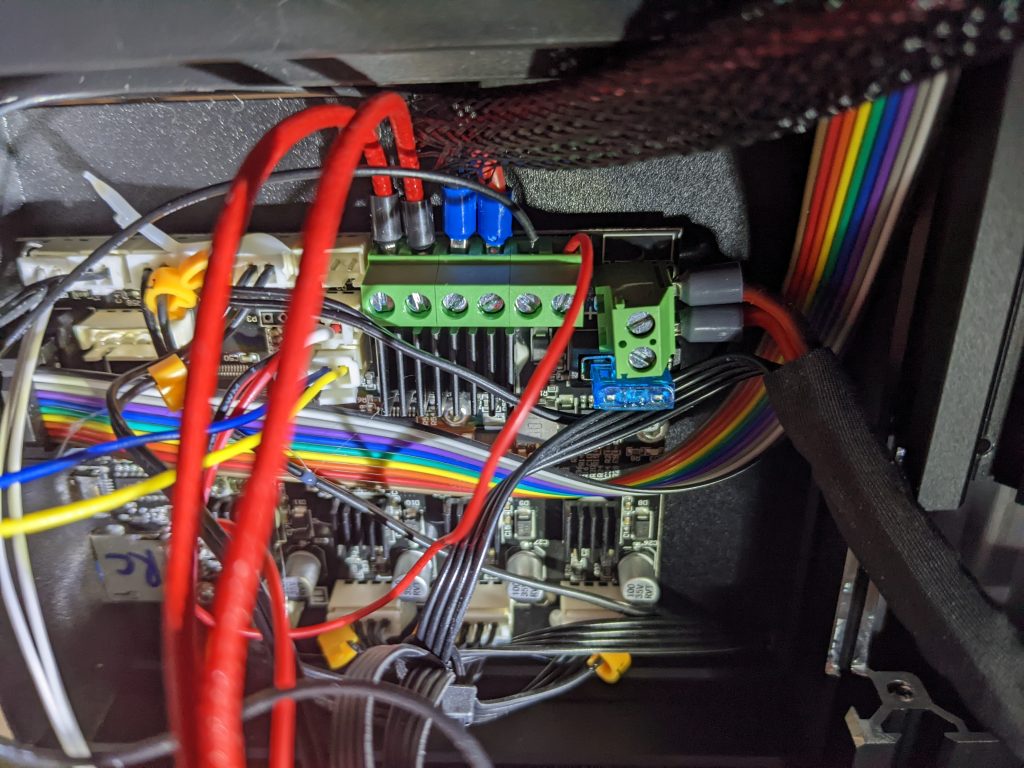
It took some work to clean up the machine. I couldn’t get the filament out of the Bowden tube. In taking things apart, it became clear that the plastic shroud and fan assembly was more damaged than I had previously thought from the earlier collision. I went searching for a replacement to buy and only found a replacement for the entire hot end assembly with wiring, hot end, nozzle, fans, shroud, and Bowden tube for $28. So I ordered it. And since I was going to be going into the control board box and swapping wires, I also decided to install ferrules on the three higher power connectors to reduce fire potential. This is an optional upgrade that I planned to do at some point and this became the time. BV3D has an excellent video on the reasons and process.
The assembly came with an older style white Bowden tube, but I decided to keep it and not repeat the Capricorn Bowden tube upgrade at the same time. I have extra tubing and will go back to the nicer blue tubing at some point. I just didn’t want to add yet another chore to a significant effort.
I closed everything up, performed a power-on smoke test and then recalibrated the heating elements. I washed the bed, then releveled and remeshed it.
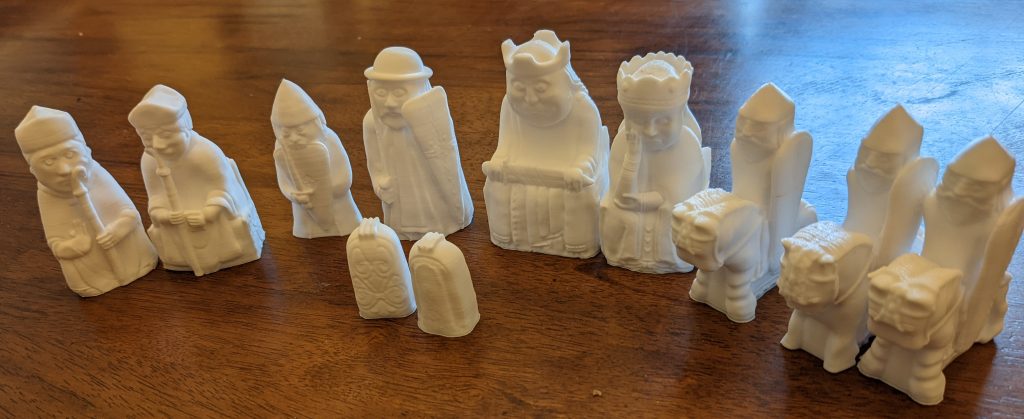
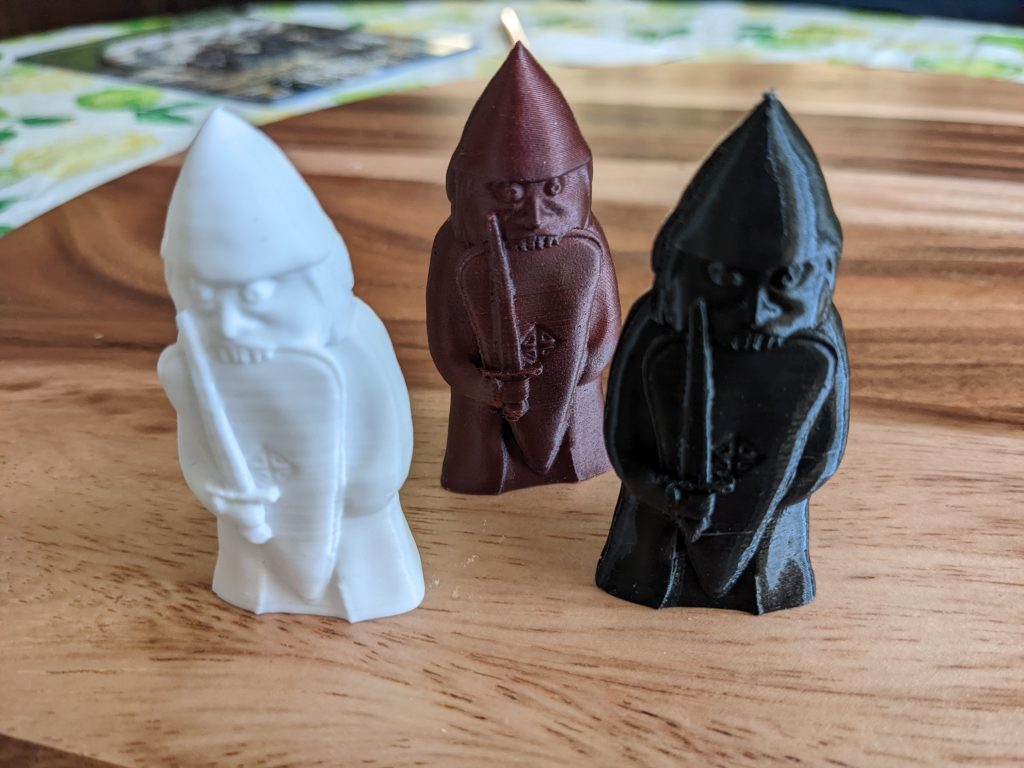
Lewis Chess Pieces
My wife found a set of very nice models of the Lewis chess pieces on thingiverse. I found one additional piece on MyMiniFactory. I had pretty good luck printing each of the models including variants (3 knights, 2 bishops) at (we think) the same size as the actual artifacts. We’re now thinking of what changes we want to make before printing a full chess set with the pieces including adjusting scale, adding support under the chin of the horses, and choosing two filament colors for the two sides of the game. We’re also going to experiment with finishing options including paint and washes.
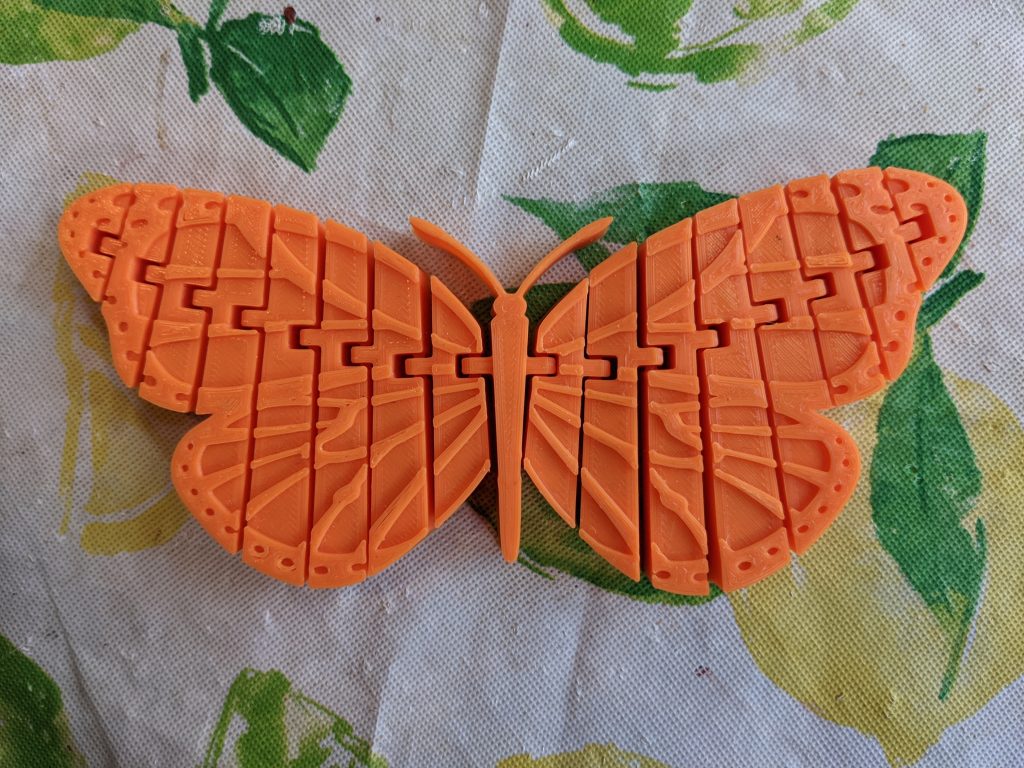
I printed this very detailed flexi monarch butterfly for my wife as part of her Valentine’s Day gifts.
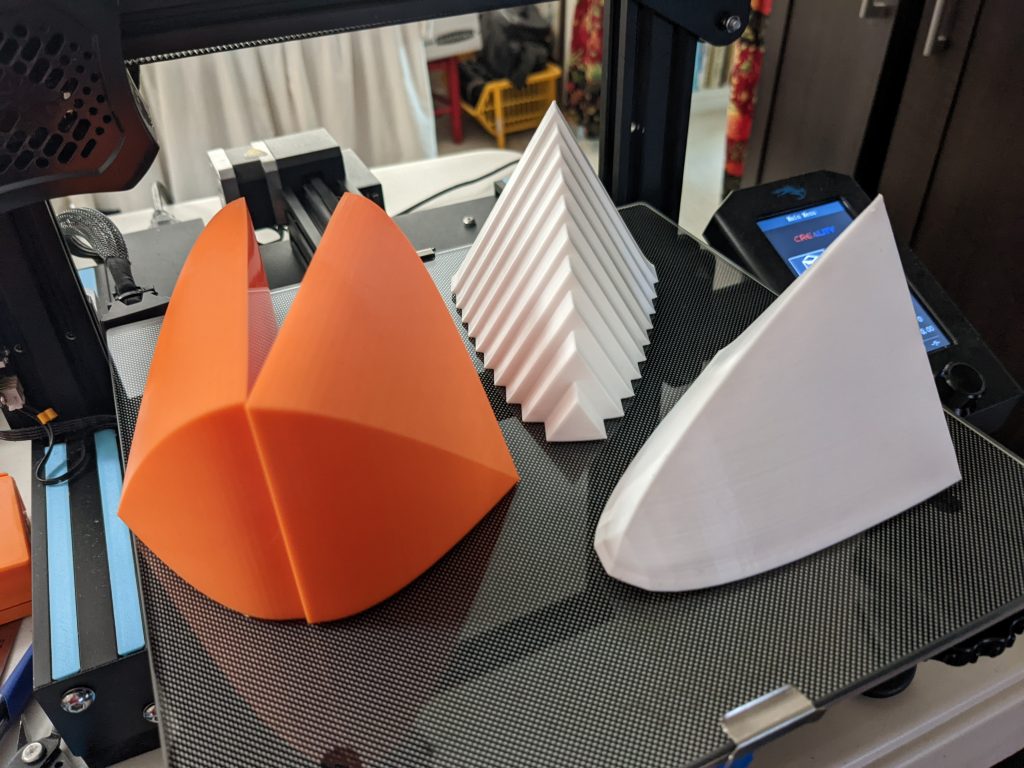
Printing Math
I have a friend who is a high school math teacher. He asked for some prints to help explain the calculus concept of calculating volume by cross sections. We’re still discussing ideas and will probably produce some other shapes. These two prototypes (in white) were designed in my Loft meshing program, pulled through Microsoft’s 3D Builder to make watertight and then printed at 10cm length. Both shapes represent an equilateral triangle extruded with the height being a parabola. One print is continuous and one is broken into 10 discrete triangles where the height is the same as the continuous one at the middle station of the triangle. The orange object is a half sine wave with a rectangular cross section. I designed it to print as two halves so that the cross section could be easily seen.
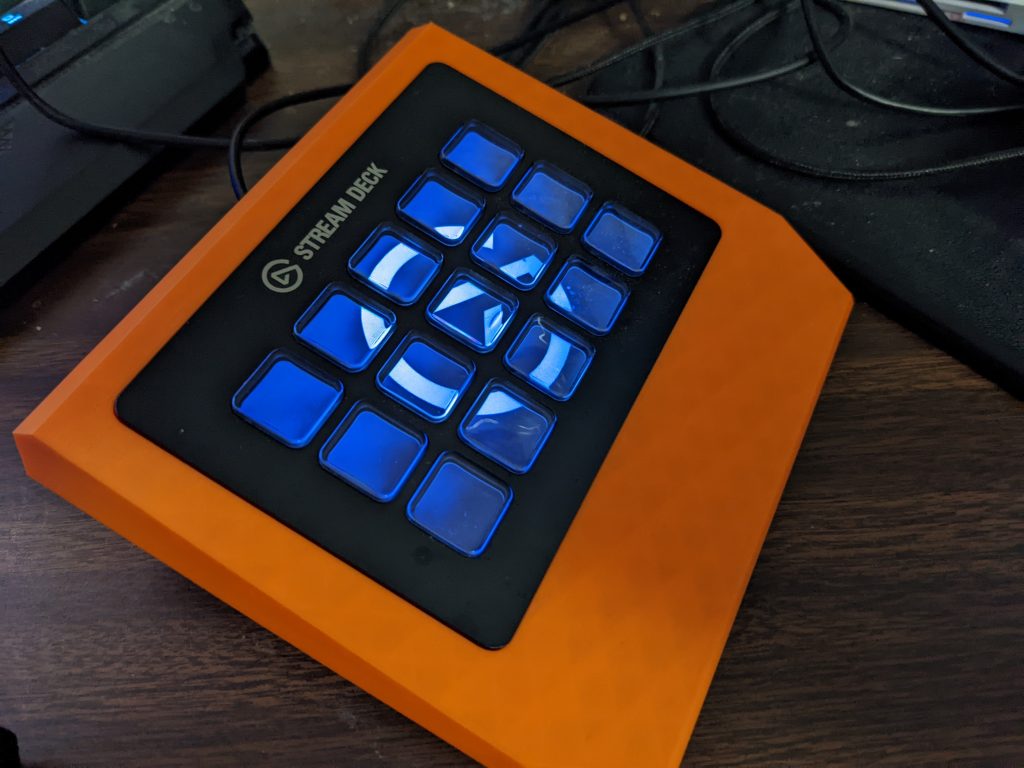
I use an Elgato Stream Deck for when I am teaching classes over a stream. The included stand is a little fiddly to me, so I printed a nice stable, fixed, stand from thingiverse.
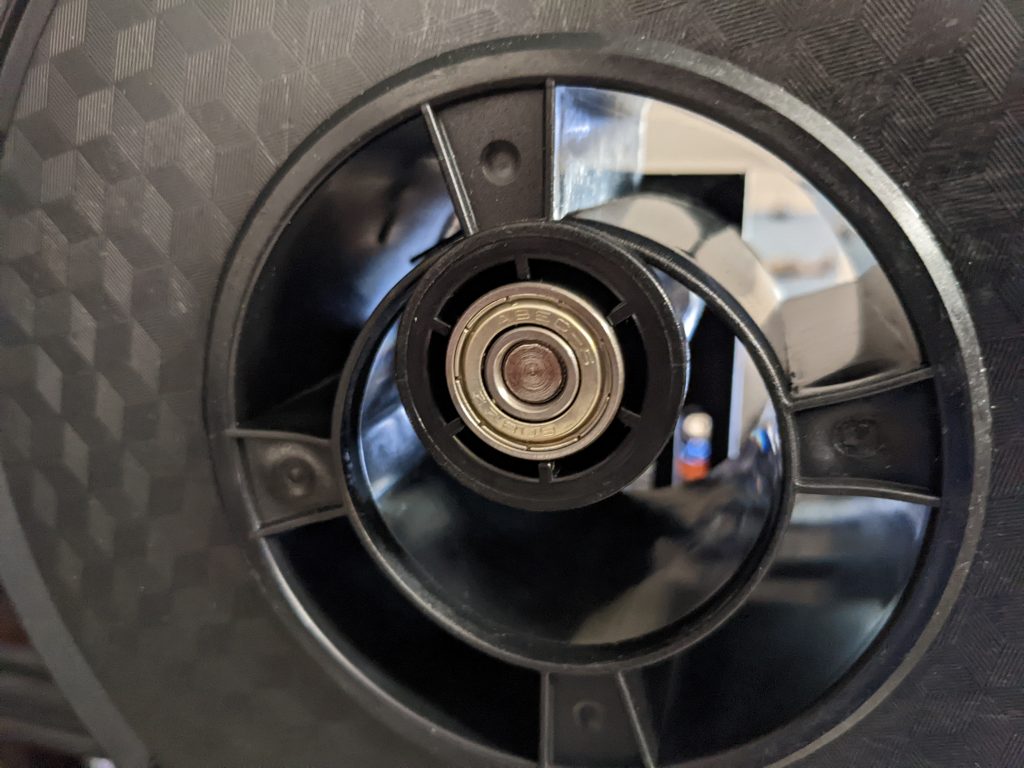
While I was printing the Stream Deck stand the printer started to make a new noise. I tracked it to the spool hanging slightly as it spun on the support axle. The stock axle on my printer is fixed with some low friction paint on it. Over 4 months of heavy use, I wore down some of the paint and the spool (even at 20% full) was no longer spinning completely freely. This also makes the extruder work a little harder. I did some looking on Thingiverse and there are lots of options for printing your own replacements. But, I ended up buying one from Amazon for $14. This one is a drop in replacement for the stock axle but has bearings on both ends and is free to rotate if it needs to. This fixed the noise that I wanted it to address.
I’ve also been experimenting with a couple of different filaments. The black filament in the picture below is not PLA but instead PVB, which is billed as being smoothable with the use of isopropyl alcohol (IPA). It printed very nicely but we haven’t tried smoothing it yet. The reddish brown filament is PLA but with 30% real wood content. It is a fair bit more expensive than normal but I decided to experiment with it when I saw it on an Amazon Lightning deal. It also printed great on my first try. The color has some nice depth to it but I am unsure that otherwise the wood content is doing very much.
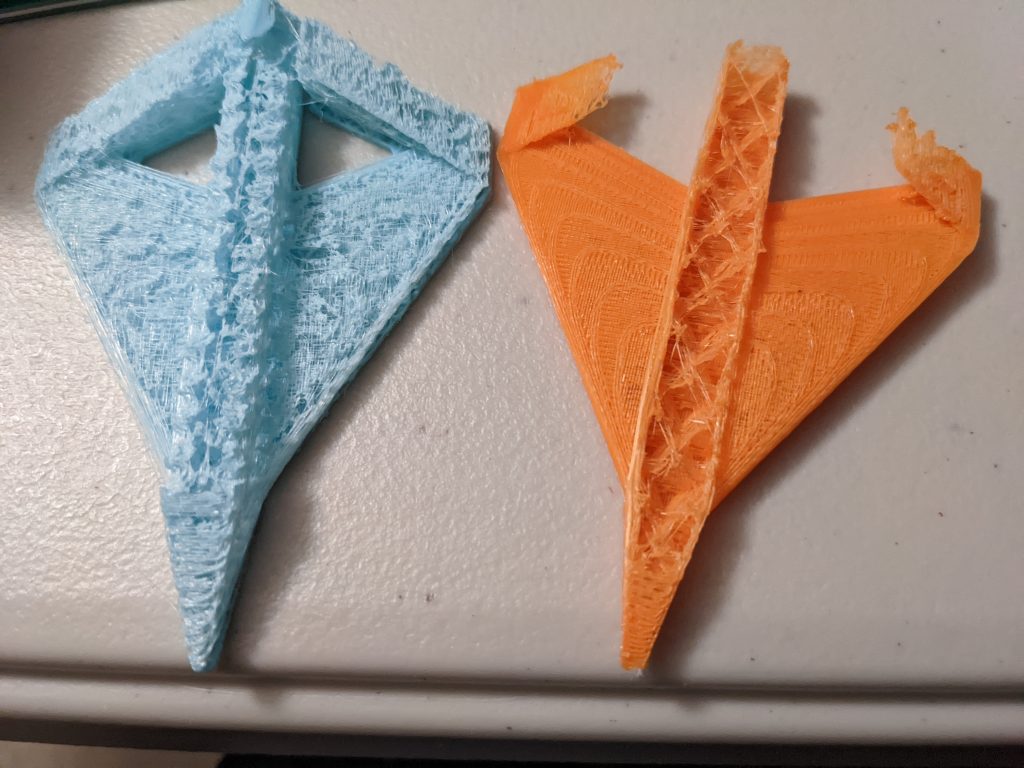
Another Jam
While trying to print a cool fractal pyramid, I suffered another filament jam. I wasn’t able to remove the filament, so ended up replacing the Bowden tube with Capricorn tubing again, replacing the nozzle, and replacing the heat break with a Copperhead bimetallic heat break from Slice Engineering following this video. I had some issues getting the new nozzle installed into its threads as that has to be done while things are hot and it took a good two dozen tries to get the nozzle started before it got too hot to handle. I also used a little thermal paste also from Slice. This upgrade should allow higher temperature, more reliable prints as well as extending the life of the Bowden tube.
Future Work
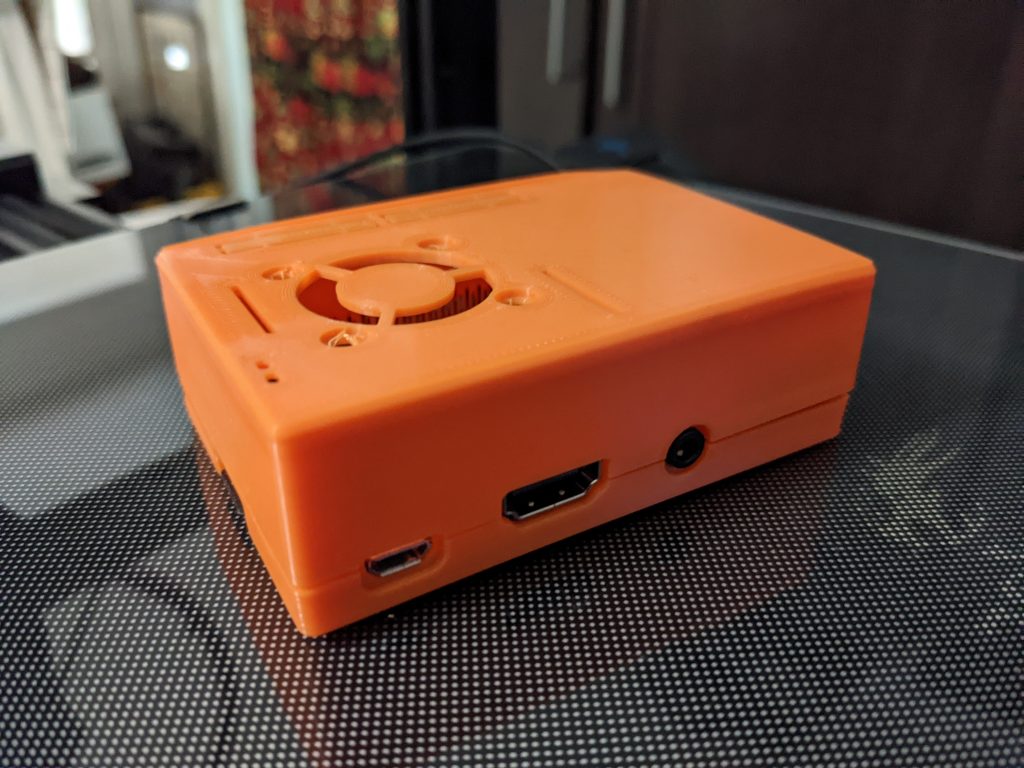
The printer has a microUSB port that a computer can connect to to control it. A popular approach to this is using a RaspberryPi and OctoPi/Octoprint. I already own a RaspberryPi that my children and I used for a couple of months and then set aside. I have been able to get Octoprint running, talking to the printer, and listening to my PC send it commands over our LAN. But, it fails when I tell it to print. So, I have some work to do to fix that problem. It could be my USB cable or I may have damaged the RaspberryPi. Once working, I won’t have to pop the microSD card in and out of the printer and computer to add gcode files to be printed.
I’ve printed a nice case for the Pi but haven’t spent the time to figure out the issue yet.
My wife also has a new hobby of spinning yarn with an electric spinning wheel called the Electric Eel. That company has put many of its parts out as STL files for home printing. I have bought the appropriate bearings to make her additional bobbin reels at some point in the future.
Summer 2022 Update
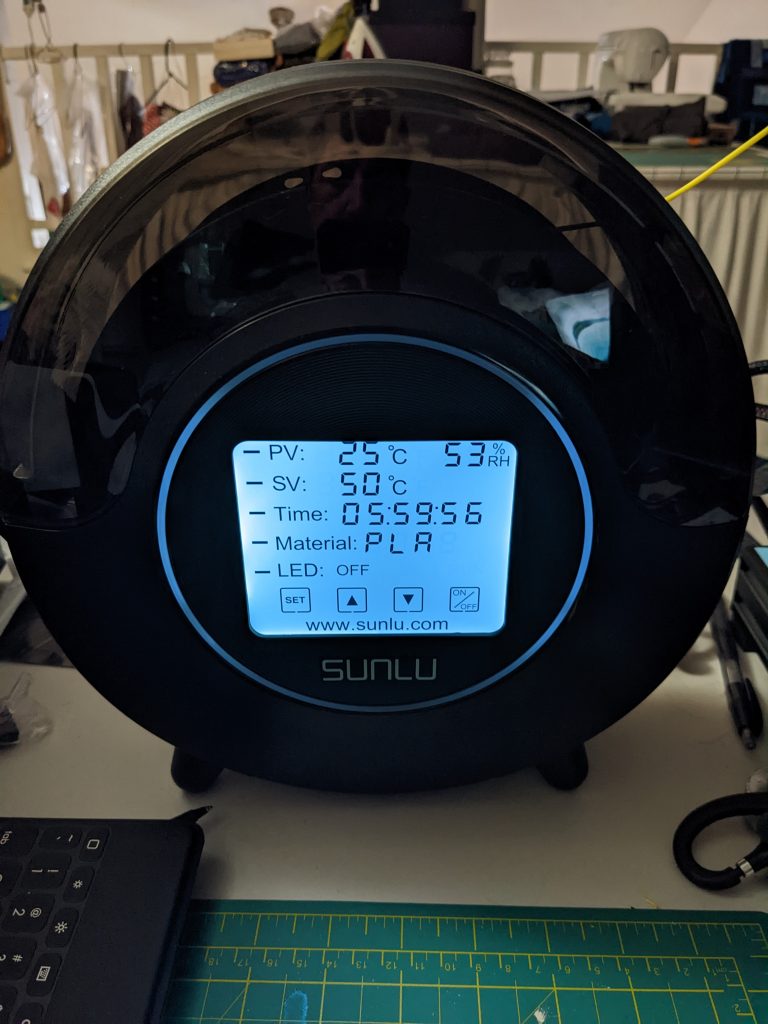
It’s been a while since my last update. I finished printing two complete sets of the Lewis chess pieces. I purchased this filament dryer to help with filament that has been sitting in the humid Virginia air for weeks.
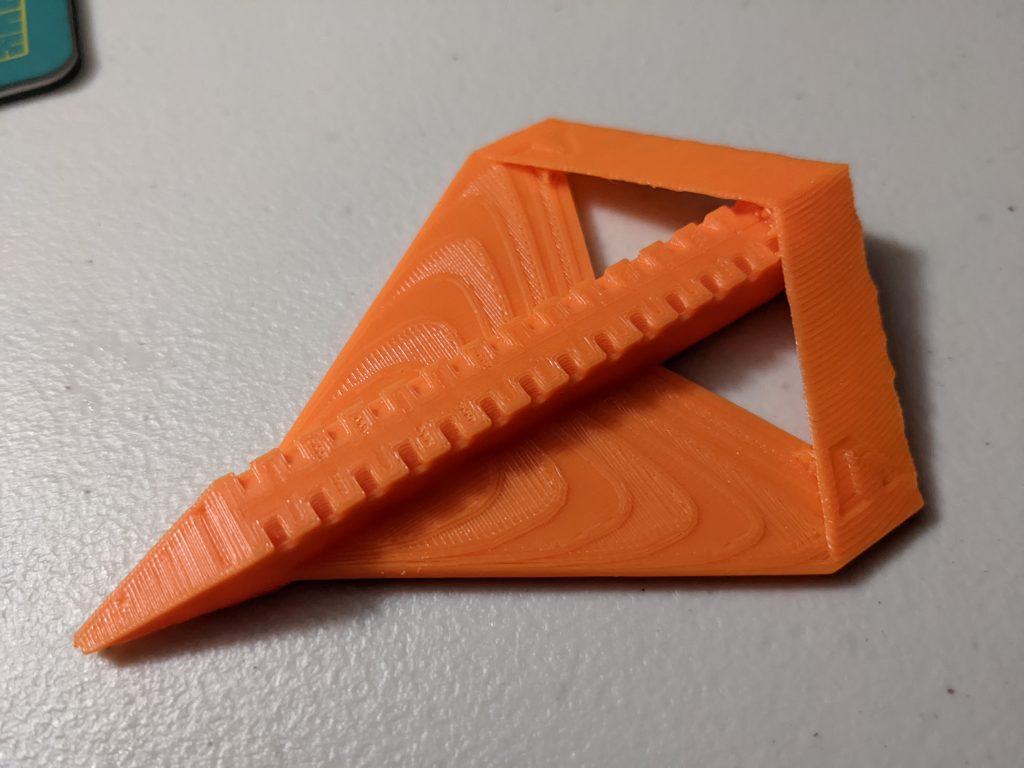
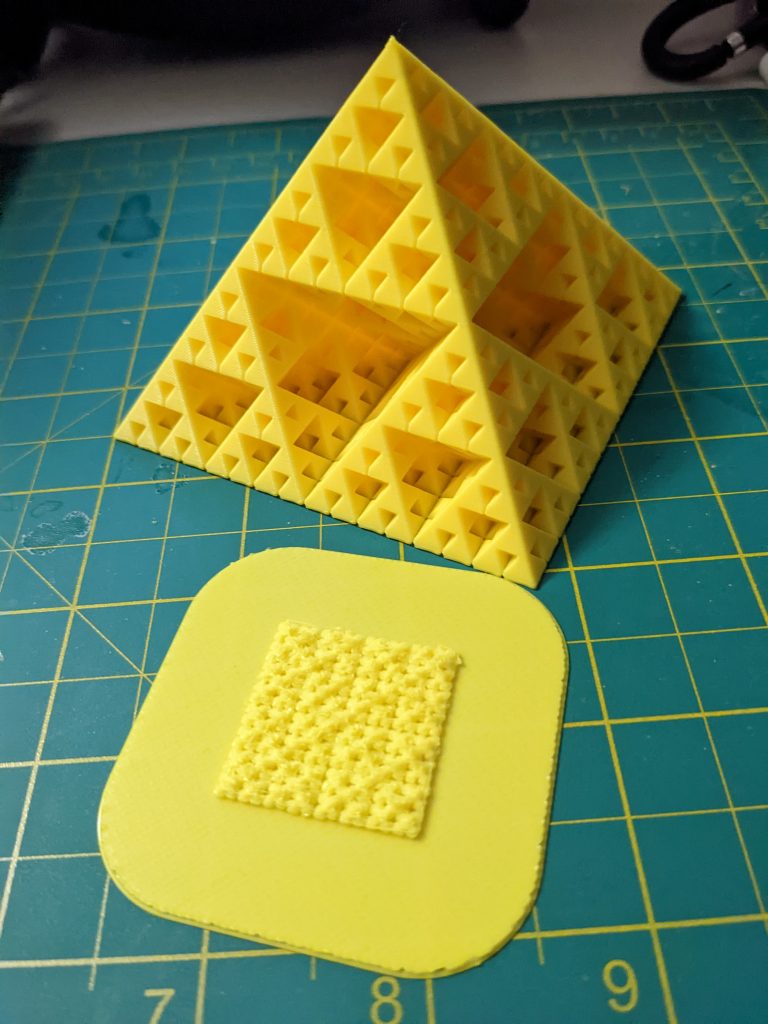
I also spotted a really cool fractal pyramid on thingiverse. It has three versions with increasing levels of detail. My printer failed repeatedly when printing it, having problems with the repeated retractions necessary for the fine detail. Over and over the filament would break just after the first level of the actual print. Finally, I tried the coarsest version of the model at a 300% scale to reduce the fine detail. That worked and looks really cool.
Loft Released & More test prints
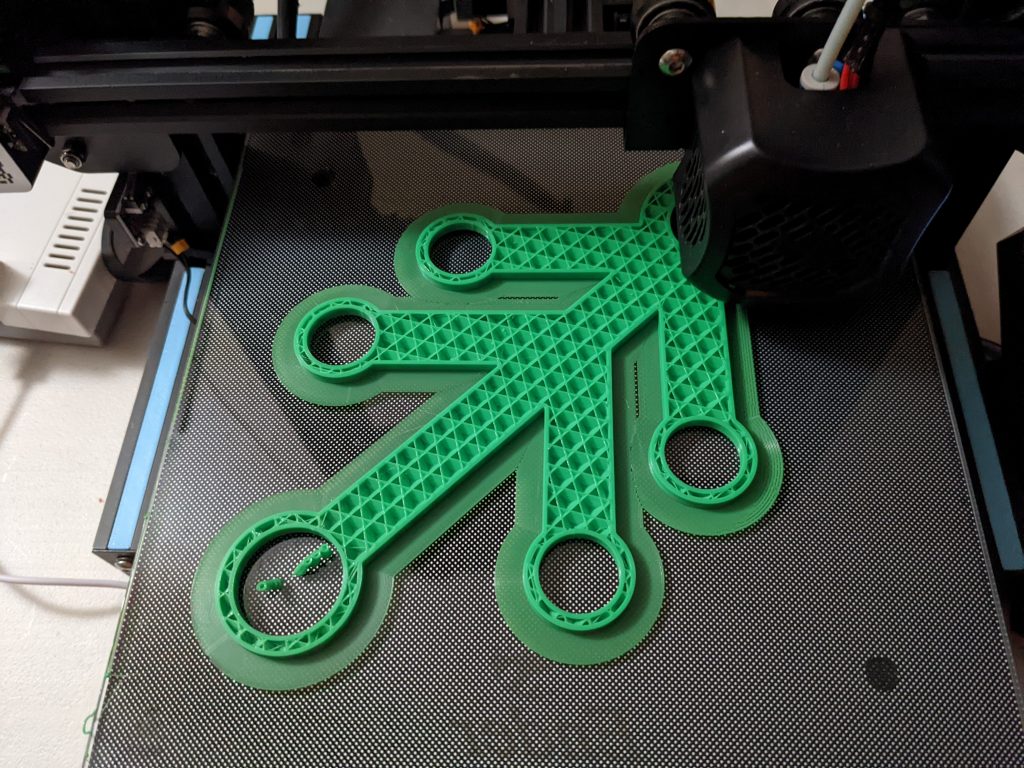
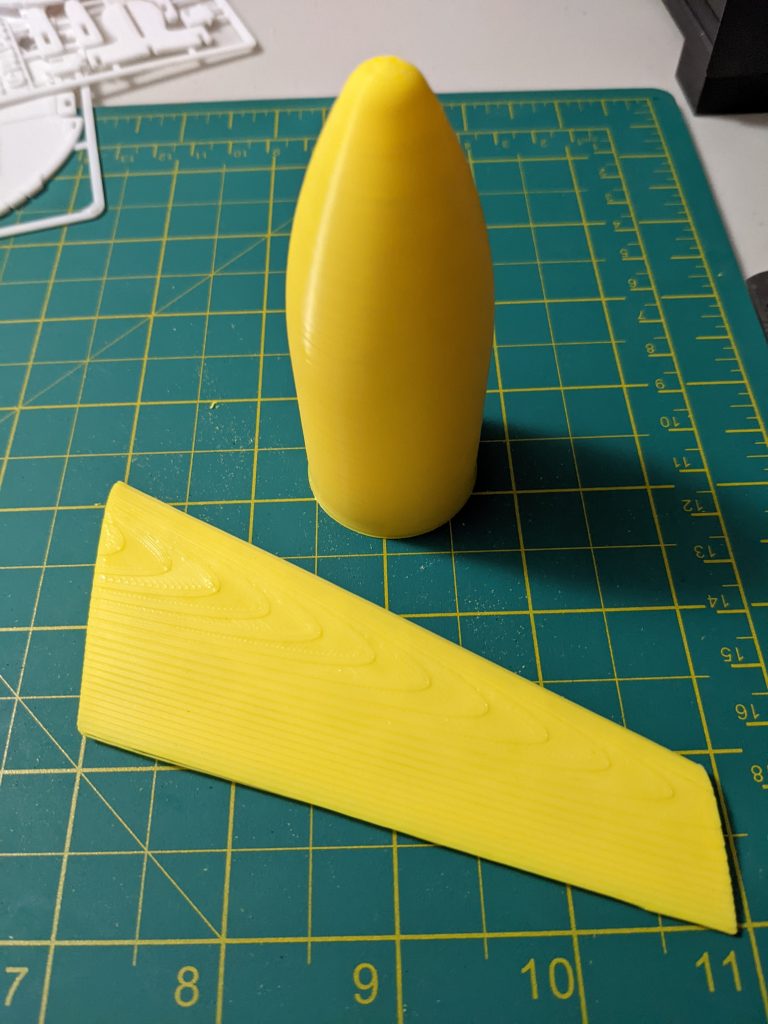
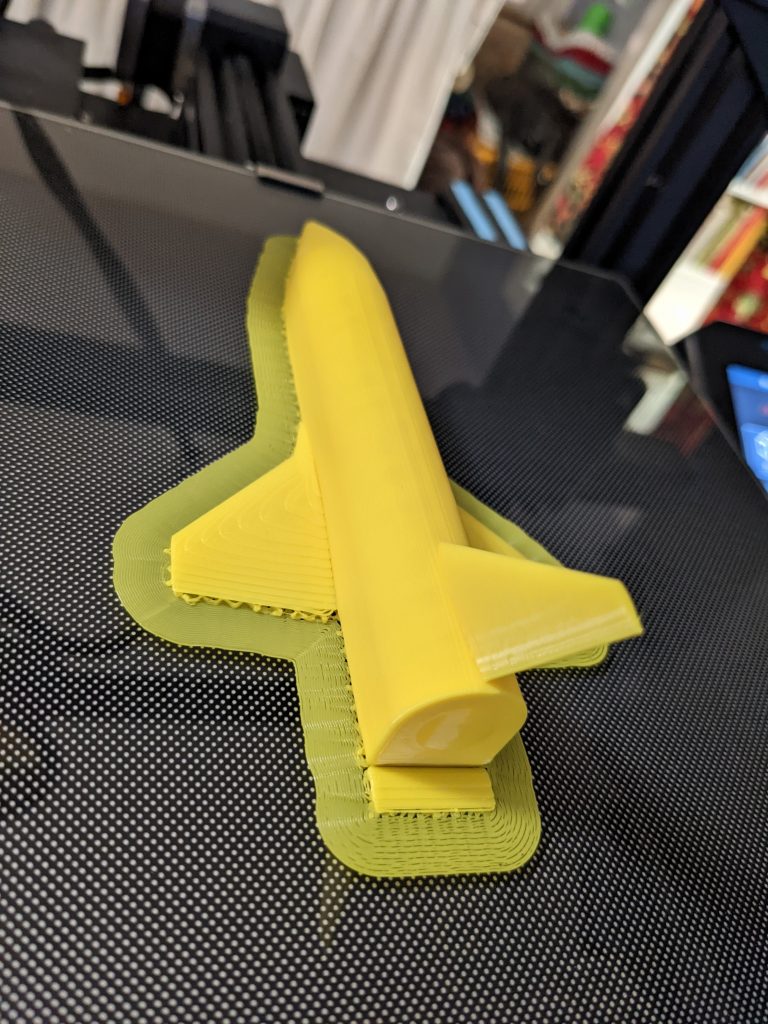
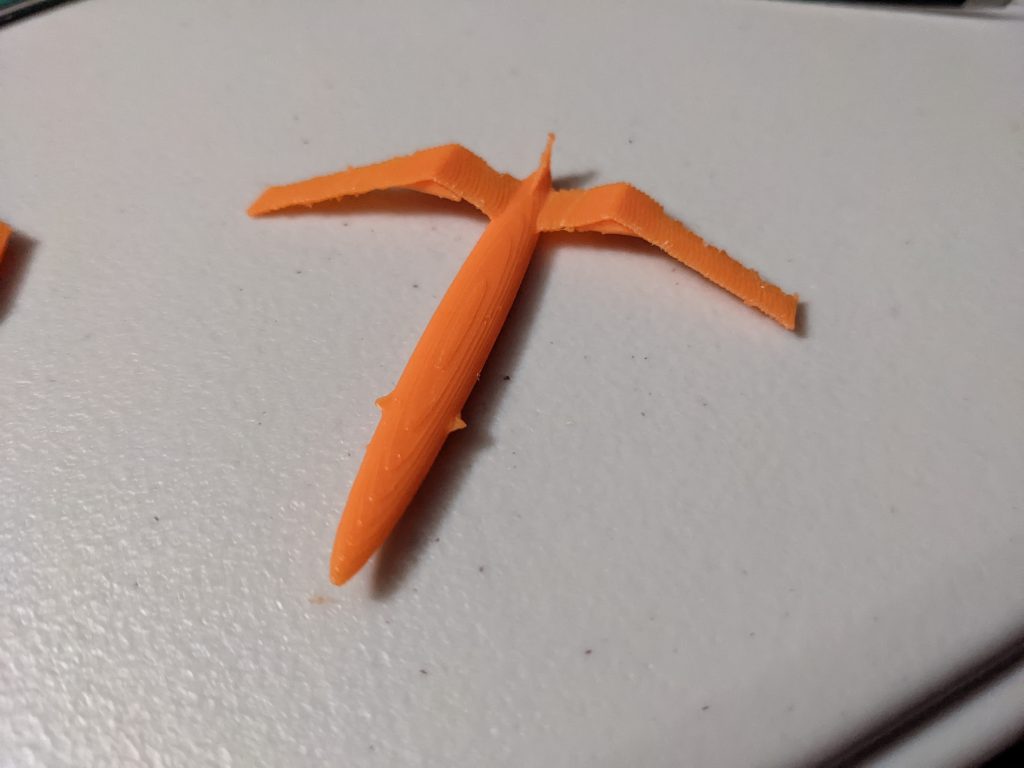
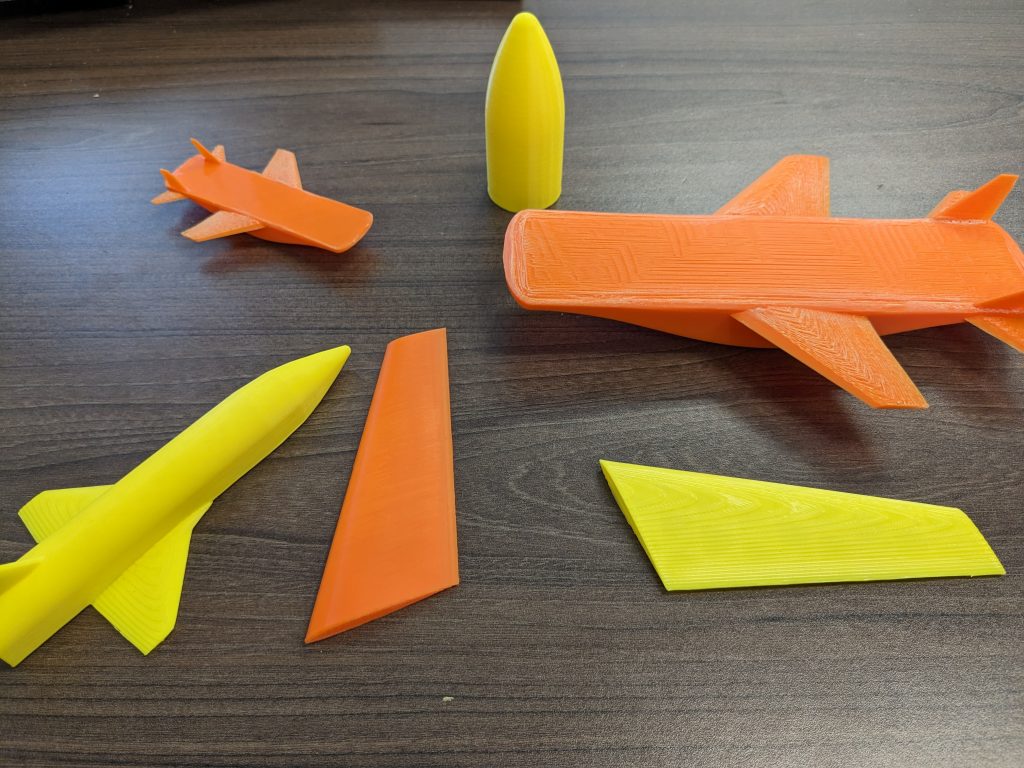
The aerospace vehicle finite element code, Loft, that I wrote as part of my job was finally actually released in mid-August 2023. Its primary purpose is not 3-D printing, but it was easy to add the STL file format to the many other mesh formats that it supports. As part of multiple presentations about the program, I created and printed a cartoon hypersonic vehicle with a fuselage, wings, and tails, but no engine. (It was printed upside down without the vertical tails that I later glued on.)
The manual for Loft is available from the NASA Technical Report Server at https://ntrs.nasa.gov/citations/20230001772 and the program itself, which comes with the manual and lots of examples, can be requested for free from the NASA software release page at https://software.nasa.gov/software/LAR-18704-1 .
A New Printer
I have recently sold my Ender 3 v2 to a friend and purchased an Ender 3 v3 SE as its replacement. The new printer has a direct drive extruder, dual z-axis screws, a built-in CR-touch device for bed leveling, and an improved bed surface. I transferred the improved filament axle from my old printer and quickly replaced the stock print bed with a PEI bed. I had too much adhesion with the stock surface and had difficulty removing brims and rafts from it. The new bed is magical: it holds onto the print while printing and releases all the plastic when it is done. Highly recommended!
I’ve printed a dozen or so things with the new printer and am happy with the upgrade. I am having to fiddle with the adhesion and the leveling much much less and getting much more reliable results. I got an amazing sale direct from Creality and paid $160 plus tax which made the upgrade a very easy choice.
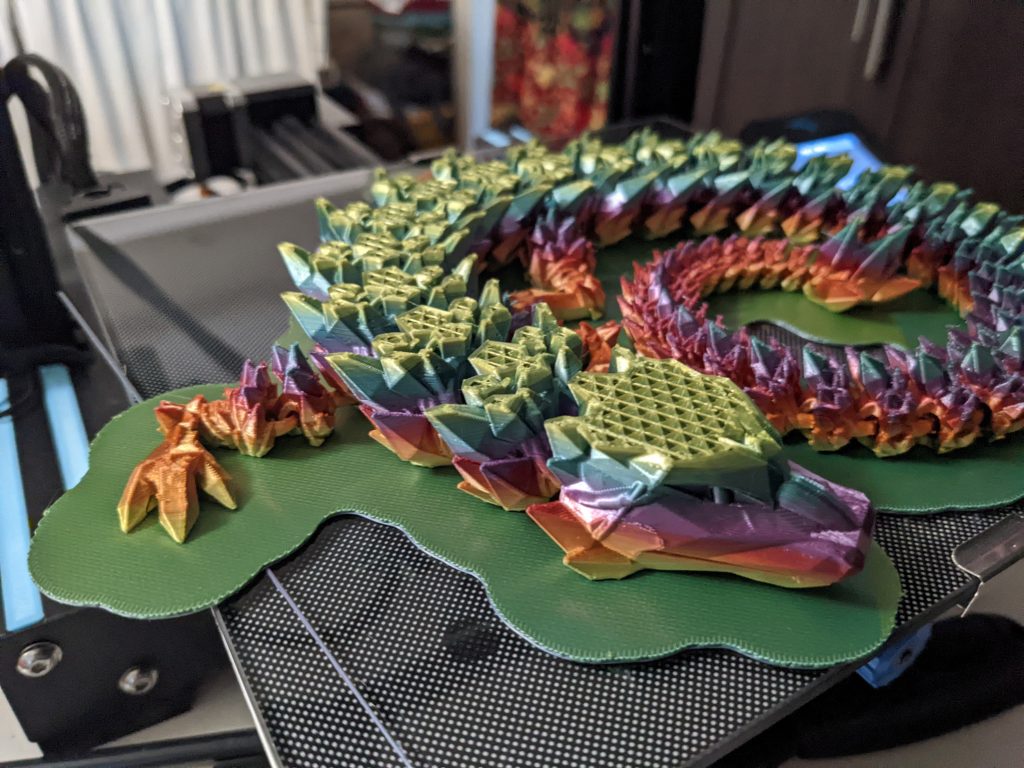
Success, Finally!
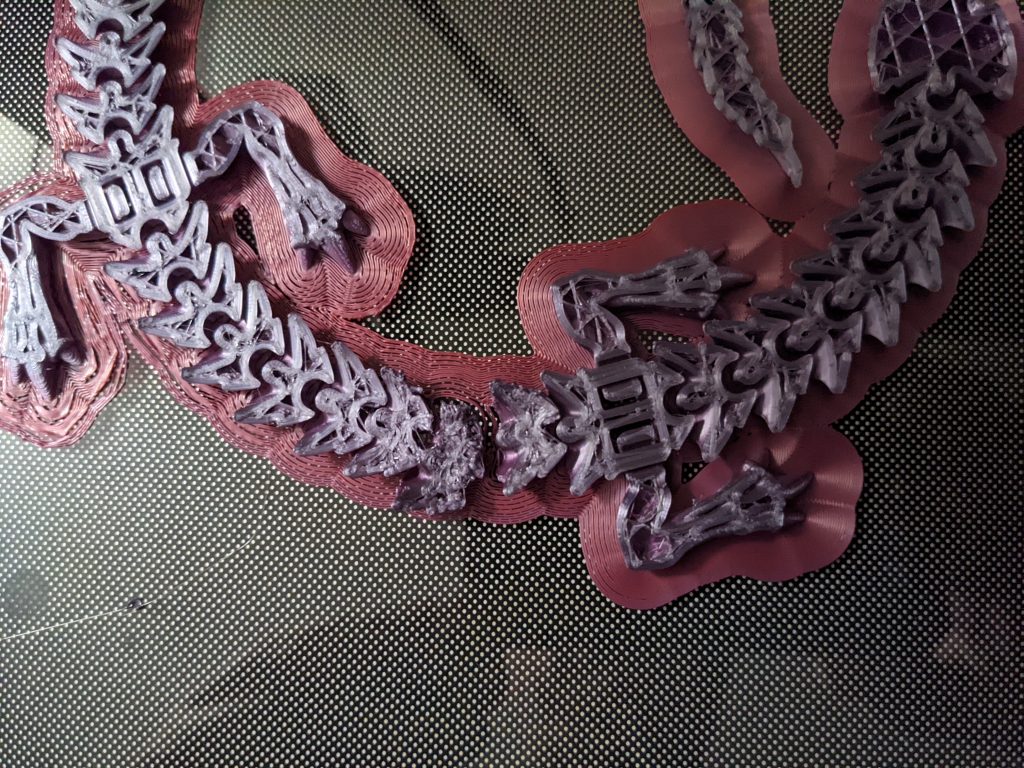
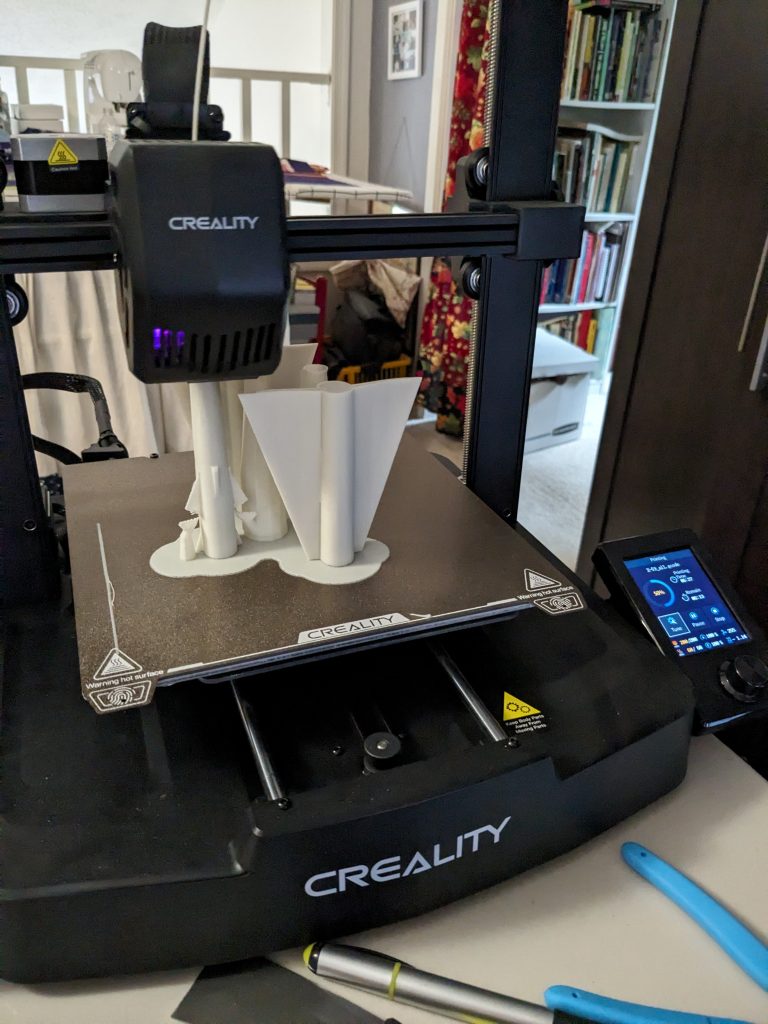
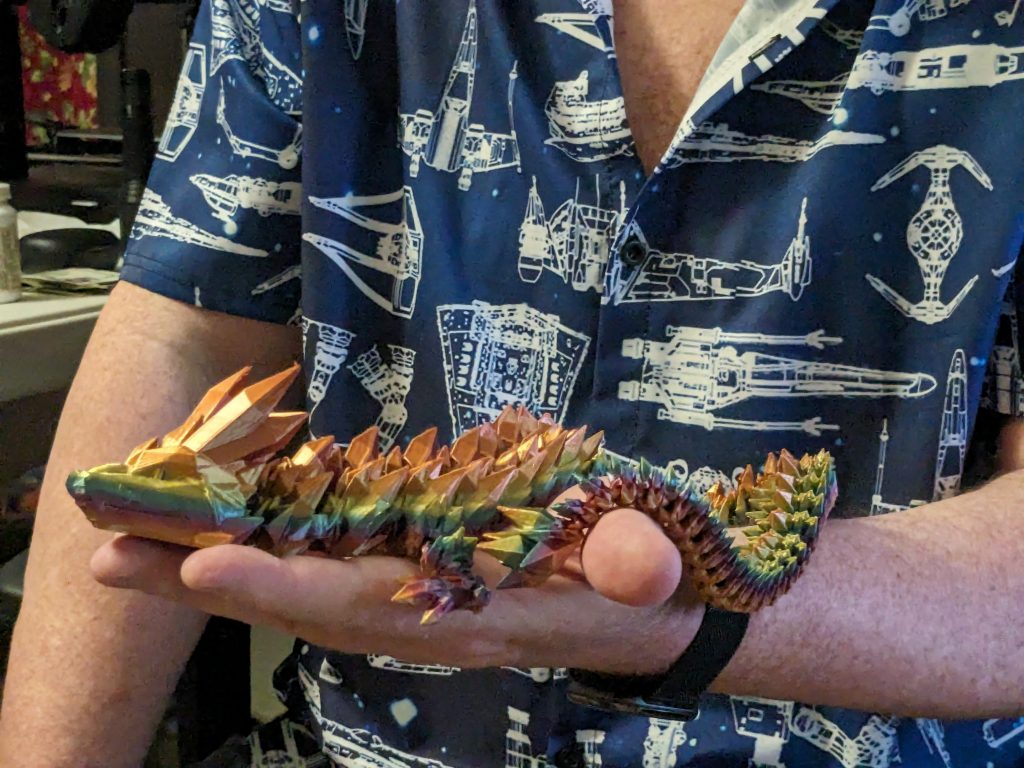
With the new printer, some fine tuning of temperatures, and some minor adjustment of how I was mounting the filament spool, I was finally successful in completing the approximately 24 hour print of the multi-color crystal dragon model that had produced spaghetti on at least 10 previous tries:
More to Come!
I’ll probably update this page from time to time with more of my printing projects and modifications so I don’t continue spamming them to my Facebook feed (or at least spam them less often.)